Cross Stitch Border Patterns: Five Easy Repeating Borders
Five original repeating borders in full crosses: zigzag, scallop, vine, checker and diamond chain. Learn how to repeat each one to any length and how to turn the corners of a frame.
At a glance
Materials
- 14-count white or cream Aida with 3 in (8 cm) spare on each side of the planned design
- Size 24 tapestry needle
- Six-strand cotton floss in teal, honey, navy, rose pink, leaf green and berry red
- Graph paper and pencil for planning corners
- Small sharp scissors
A border does more for a small design than almost any other addition: it frames a name, finishes the edge of a towel band, or turns a single motif into a complete sampler. The five cross stitch border patterns on this page are original, use full crosses only and are built on short repeats, so they can be stretched to any length. Together the strips fill a sheet of 33 x 34 stitches with 6 colors, but they are meant to be used one at a time, repeated as often as your project needs.
The Five Borders at a Glance
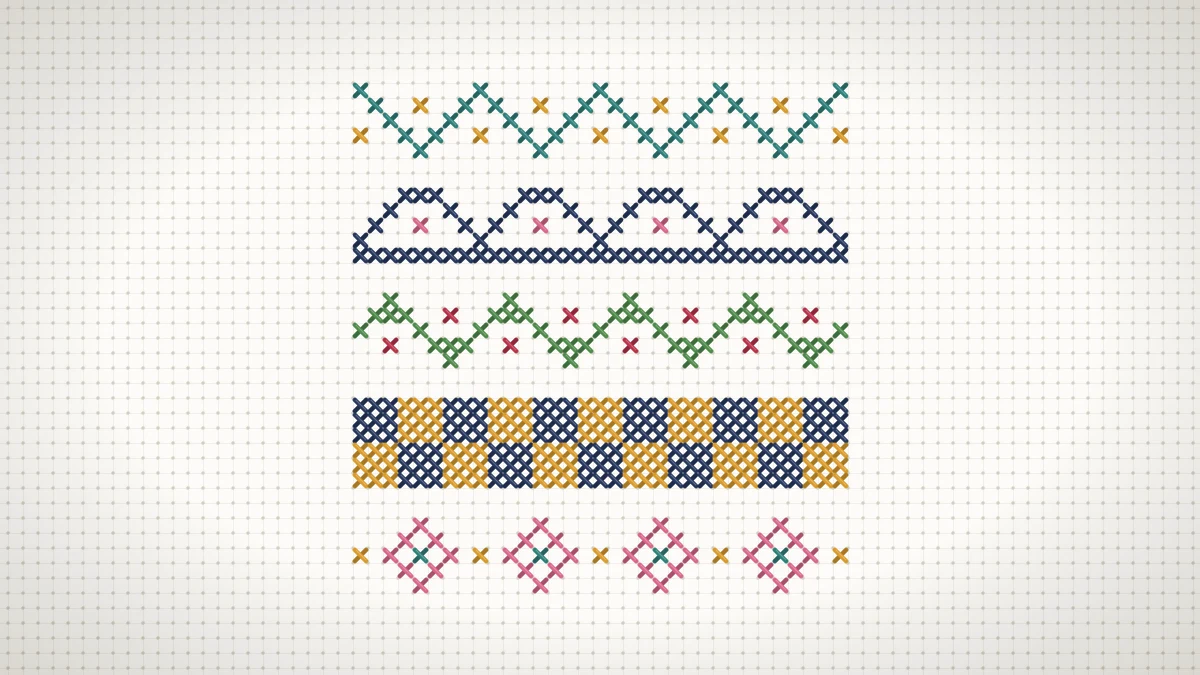
From top to bottom the chart shows a zigzag, a scallop, a vine, a checker band and a diamond chain. Each strip is drawn with several complete repeats so the rhythm is easy to see.
| Border | Repeat (stitches) | Height (rows) | Colors |
|---|---|---|---|
| Zigzag | 8 | 5 | Teal line, honey dots |
| Scallop | 8 | 5 | Navy arches and base line, rose pink dots |
| Vine | 8 | 5 | Leaf green stem and leaves, berry red berries |
| Checker | 6 | 6 | Navy and honey blocks |
| Diamond chain | 8 | 5 | Rose pink diamonds, teal centers, honey links |
The “repeat” is the number of stitches after which the pattern starts again. It is the only number you need in order to plan a border of any length.
The Chart
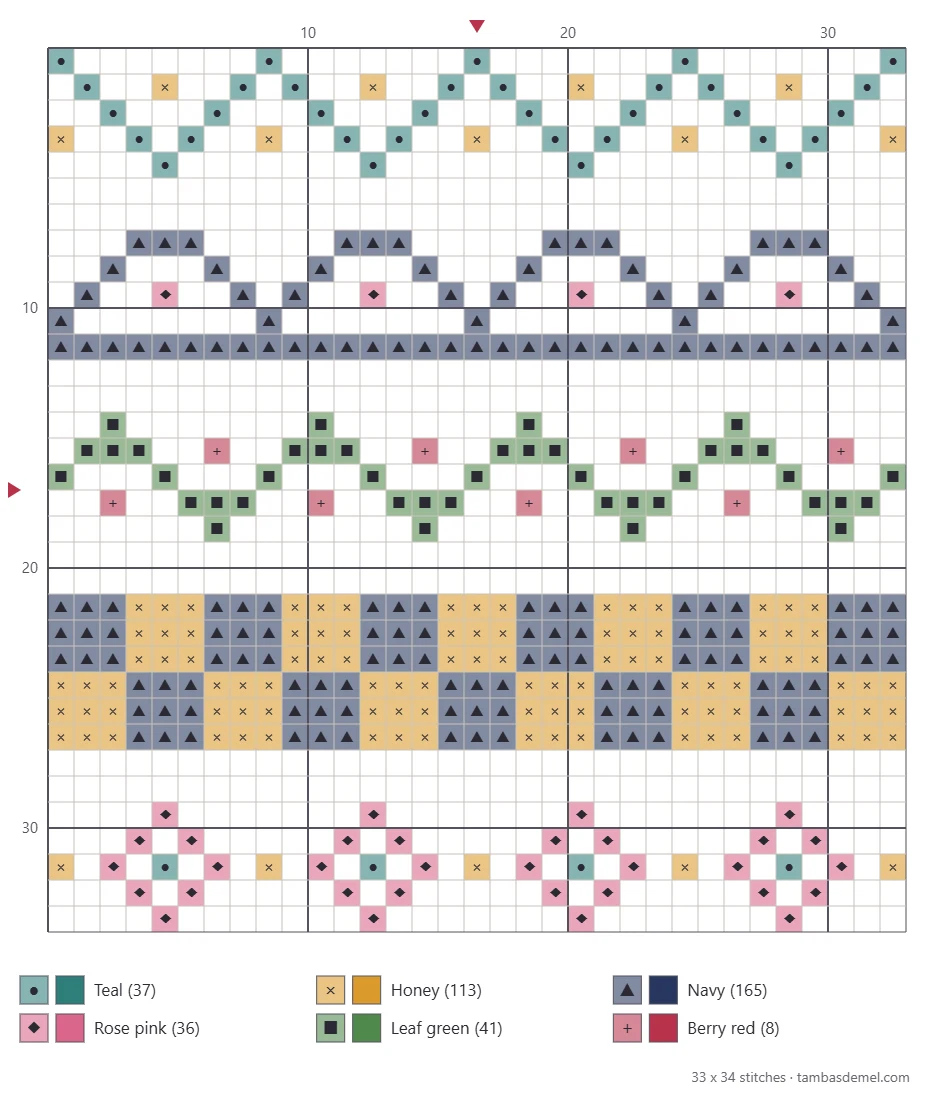
One square is one cross stitch. The empty rows between the strips are only there to separate them on the page; they are not part of any border. For a refresher on symbols and grid lines, see how to read a cross stitch chart.
Color Key
| Symbol | Color | Stitches |
|---|---|---|
| ● | Teal | 37 |
| × | Honey | 113 |
| ▲ | Navy | 165 |
| ◆ | Rose pink | 36 |
| ■ | Leaf green | 41 |
| + | Berry red | 8 |
The stitch totals in the key cover the whole sheet as charted. The six shades are suggestions: match them from your own floss, or recolor each border to suit the design it will frame. A border usually looks best when it borrows one or two colors from the main motif rather than introducing new ones.
Materials and Sizes
- 14-count Aida in white or cream, with 3 in (8 cm) spare on every side of the planned design
- Size 24 tapestry needle
- Six-strand cotton floss, 2 strands for 14-count
- Graph paper and a pencil for planning corners
The table below gives the finished size of the complete sheet, which is useful if you want to stitch all five strips as a practice sampler. On 14-count that sampler measures 2.4 x 2.4 in (6.1 x 6.1 cm).
| Aida | Finished design | Fabric to cut (3 in spare per side) |
|---|---|---|
| 11-count | 3 x 3.1 in (7.6 x 7.9 cm) | 9 x 9.5 in (22.9 x 24.1 cm) |
| 14-count | 2.4 x 2.4 in (6.1 x 6.1 cm) | 8.5 x 8.5 in (21.6 x 21.6 cm) |
| 16-count | 2.1 x 2.1 in (5.3 x 5.3 cm) | 8.5 x 8.5 in (21.6 x 21.6 cm) |
| 18-count | 1.8 x 1.9 in (4.6 x 4.8 cm) | 8 x 8 in (20.3 x 20.3 cm) |
For a single border, do the arithmetic yourself: finished length in inches equals the number of stitches divided by the fabric count. A band of 8 repeats of the zigzag plus its closing stitch is 65 stitches long, which is a little over 4.6 in (11.8 cm) on 14-count.
How Each Border Is Built
Zigzag
A single line of teal climbs four rows and drops four rows. A honey dot sits above each valley and below each peak. Work the teal line first from left to right, completing each cross as you go because the stitches touch only at their corners, then add the dots.
Scallop
Navy arches stand on a solid navy line, with one rose pink stitch inside each arch. Stitch the base line first: it is a plain row and gives you a ruler to count the arches from. Turned upside down, the same border looks like a lace edging hanging from a line.
Vine
The green stem runs high for three stitches, steps down, runs low for three stitches and steps up again. A small leaf sits on the outside of each curve and a red berry is tucked into the inside. Stitch the stem completely before adding leaves and berries.
Checker
Blocks of three by three stitches alternate between navy and honey in two rows. It is the densest border of the set and makes a strong, modern frame. Stitch all the blocks of one color first, then fill the gaps with the other.
Diamond chain
Open diamonds in rose pink each hold one teal stitch, and a single honey stitch links one diamond to the next. This border is very light, with a lot of fabric showing, so it suits delicate designs such as a floral wreath cross stitch pattern.
How to Repeat a Border to Any Length
- Decide the length you need in stitches. Count the width of the design the border will sit under or around, and add the gap you want on each side.
- Round to whole repeats. Divide by the repeat from the table and round to a whole number. A border that stops in the middle of a repeat looks cut off.
- Add the closing stitch. The zigzag, scallop, vine and diamond chain all look balanced when they end on the same stitch they began with, so their length is the repeat multiplied by the number of repeats, plus 1. The checker band ends neatly on a whole block, so its length is any multiple of 3; use an odd number of blocks if both ends should be the same color.
- Center it. Find the middle of the border and the middle of the design, and line them up. Stitch outward from the center in both directions so that both ends finish identically.
Tip
If the border comes out a few stitches too long or too short for the design, change the gap between design and border instead of squeezing a repeat. Nobody notices one extra empty square; everybody notices a squashed zigzag.
How to Turn Corners
A frame needs four corners, and a repeating pattern does not automatically know how to go around one. There are three reliable ways to solve it.
Corner blocks
The simplest method is not to turn the border at all. Reserve a square at each corner with sides equal to the height of the border, five by five stitches for most of this set, and fill it with a tiny motif: a solid square with a contrasting center stitch, or a small diamond. The four borders then run straight between the blocks, each one a whole number of repeats plus the closing stitch.
The mirror method
Stand a small flat mirror upright on the printed chart at a 45 degree angle to the strip. The border and its reflection together show how the pattern looks when it turns. Slide the mirror along until the corner looks pleasing, for example exactly through a peak of the zigzag or the center of a diamond, then copy what you see onto graph paper. All four corners use the same drawing, turned.
Let the pattern turn itself
The checker band needs no corner design. Keep alternating the blocks around the corner as if it were a checkerboard; as long as every side is a whole number of blocks long, the colors meet correctly all the way around.
Watch out
Plan the whole frame on paper before stitching, and count the first side twice. A border that is one stitch out will not meet itself when it comes back around, and the error only shows at the last corner. The habits in counting cross stitch help prevent it.
Where to Use Borders
- Under and over a name. Stitch a word with the modern cross stitch alphabet and place the same border above and below it.
- Along a bookmark. A narrow band down each long edge is the classic layout; the cross stitch bookmark pattern shows how to finish one.
- As a band sampler. Stitch all five strips one under another exactly as charted, in your own colors, and frame the result.
- On household linen. A single strip across an Aida band dresses up a towel or a shelf edge.
Whatever the project, stitch the main design first and the border last, so the border can still be adjusted.
Frequently asked questions
How long should a cross stitch border be?
Long enough to cover the design plus an equal gap at each end, rounded to a whole number of repeats. Count the design in stitches first, then adjust the gap so that the border ends on a complete repeat.
Which border is the easiest to start with?
The checker band, because it is made of plain blocks with nothing to count diagonally. The zigzag is a good second choice: one line, a regular rhythm and only a few dots to add afterward.
Can the borders be stitched vertically?
Yes. Turn the chart a quarter turn and stitch the strip from top to bottom. Keep the top leg of every cross slanting the same way as in the rest of the piece, even though the chart has been rotated.
Do all four sides of a frame need the same number of repeats?
No. Opposite sides must match each other, but the top and bottom can have a different number of repeats from the left and right. Each side simply needs a whole number of repeats between the corners.