Simple Star Cross Stitch Pattern in Three Shades of Gold
An original five-pointed star in full crosses, with an amber outline, a golden body and a glowing pale center. Chart, color key, sizes and stitching order included.

At a glance
Materials
- 14-count sky blue Aida with 3 in (8 cm) spare on each side
- Size 24 tapestry needle
- Six-strand cotton floss in deep amber, golden yellow and pale lemon
- Small sharp scissors
- Small embroidery hoop (optional)
Five points, three shades of gold and not a single tricky stitch: this simple star cross stitch pattern is a quick motif for cards, ornaments, baby gifts and the corners of larger samplers. The star is 21 x 19 stitches, uses 3 colors and has 173 full crosses in total. A deep amber outline holds the shape, golden yellow fills the body, and a small diamond of pale lemon in the middle makes the star look as if it glows.
Why a Star Is Good Practice
A heart or a square is made mostly of straight rows. A star is different: its edges are all diagonals, and diagonals are where counting skills are really learned. On this chart the points step outward in a regular rhythm, so you practice counting “one over, one down” or “two over, one down” again and again until it becomes automatic.
The left and right halves of the star are exact mirror images. That gives you a built-in check: when the left side of a row is finished, the right side must have the same number of stitches in the same colors. If it does not, the mistake is in the row you are looking at, and it can be fixed before it travels any further. More checking habits like this are covered in the guide to counting cross stitch.
Materials
- 14-count Aida in sky blue, cut with 3 in (8 cm) of spare fabric on every side of the design
- Size 24 tapestry needle
- Six-strand cotton floss in the three shades listed in the key
- Small sharp scissors
- A small embroidery hoop, optional
The sample is planned for pale blue fabric because gold reads clearly against it, like a star in a daytime sky. Navy or charcoal Aida gives a night-sky look and is just as suitable, although dark fabric is harder to see through; good light makes a real difference. White and cream work too, as long as the amber outline is stitched: without it the pale lemon and yellow would fade into a light background.
The Chart
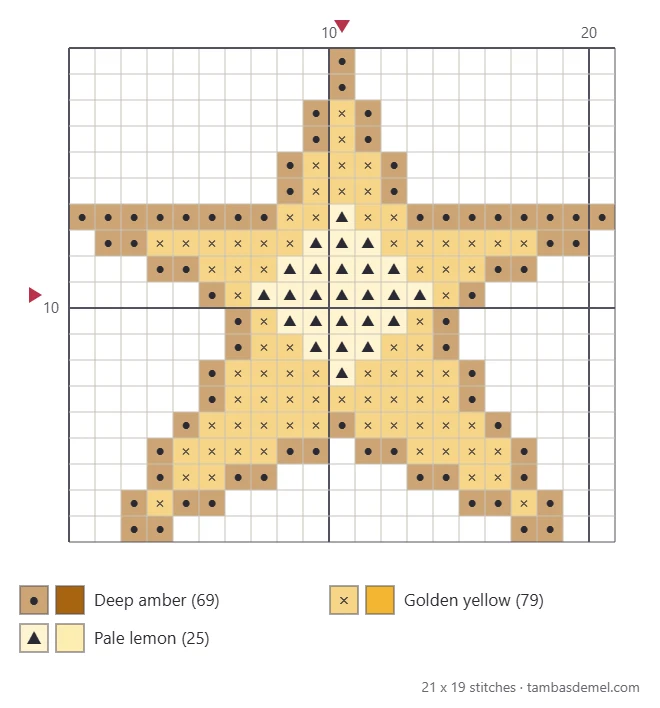
Each square on the chart is one full cross over one block of Aida. The center arrows meet inside the pale lemon diamond, a little below the level of the two side points. If charts are new to you, how to read a cross stitch chart walks through the grid, symbols and key.
Color key
| Symbol | Color | Stitches |
|---|---|---|
| ● | Deep amber | 69 |
| × | Golden yellow | 79 |
| ▲ | Pale lemon | 25 |
Choose the shades from your own floss by eye. The outline should be a brownish gold that is obviously darker than the fill; the fill a warm, saturated yellow; the center the palest yellow you have that is still visibly not white. Lay the three skeins on the fabric before starting. If the palest one vanishes against the cloth, pick a slightly stronger shade.
Finished Size
Stitched on 14-count Aida, the star measures 1.5 x 1.4 in (3.8 x 3.6 cm). Finished size is the stitch count divided by the fabric count, so a lower count makes a bigger star and a higher count a smaller one.
| Aida | Finished design | Fabric to cut (3 in spare per side) |
|---|---|---|
| 11-count | 1.9 x 1.7 in (4.8 x 4.3 cm) | 8 x 8 in (20.3 x 20.3 cm) |
| 14-count | 1.5 x 1.4 in (3.8 x 3.6 cm) | 7.5 x 7.5 in (19.1 x 19.1 cm) |
| 16-count | 1.3 x 1.2 in (3.3 x 3 cm) | 7.5 x 7.5 in (19.1 x 19.1 cm) |
| 18-count | 1.2 x 1.1 in (3 x 2.8 cm) | 7.5 x 7.5 in (19.1 x 19.1 cm) |
Use 2 strands of floss on 14-count and 16-count, 3 strands on 11-count, and 1 or 2 strands on 18-count. The right needle changes too: size 22 for 11-count, size 24 for 14-count and size 26 for the two finest counts.
Stitching the Star Step by Step
- Mark the center of the fabric. Fold it in half both ways and place a pin where the folds cross.
- Stitch the pale lemon diamond. Begin at the center with 2 strands and a loop start. The diamond is only a handful of stitches, widest in its middle row, and it gives you a fixed landmark for everything else.
- Fill the body in golden yellow. Work outward from the diamond in horizontal rows. Stitch the first leg of every cross along the row and complete them on the way back.
- Stitch the upper point. The yellow column narrows as it climbs. Count each row against the chart, because this point sets the height of the whole star.
- Stitch the two side points. They leave the body in the same row, one to the left and one to the right, and taper to their tips in three rows.
- Stitch the two lower points. Below the narrowest part of the star the shape widens again and then splits into two legs with a notch of bare fabric between them.
- Outline in deep amber. Go around the star once. The tips of all five points are amber only, so the outline is what gives them their sharp ends.
Tip
When a row has only one or two stitches of a color, as in the tips of the points, complete each cross before moving to the next instead of working in two passes. It keeps the thread path short on the back and the tension even.
Keeping the Points Sharp
Narrow shapes show every flaw, so three habits matter more here than in a solid block.
Same top leg everywhere
Pick one direction for the top diagonal and never change it, even when you turn the fabric to reach a point more comfortably. If you rotate the work, rotate your thinking with it. A single reversed cross in a one-stitch-wide tip is very visible.
Do not pull the tips tight
A lone stitch at the end of a point has nothing beside it to resist the pull of the thread, so it is easy to drag the hole open. Let the floss lie flat on the fabric and stop pulling the moment it does. The guide to cross stitch tension explains what even tension looks and feels like.
Secure threads inside the body
Finish every thread by running it under three or four stitches on the back, and choose stitches in the wide middle of the star for this. A tail tucked along a narrow point can peek out past the edge on the front.
Watch out
Do not jump across the notch between the two lower points with the thread on the back. On light fabric the carried strand shows as a dark line in the gap. End the thread and restart on the other leg.
Color Ideas
| Style | Outline | Fill | Center | Fabric |
|---|---|---|---|---|
| Classic gold | Deep amber | Golden yellow | Pale lemon | Sky blue |
| Night sky | Golden yellow | Pale lemon | White | Navy |
| Christmas red | Dark red | Bright red | Soft pink | White |
| Nursery | Medium blue | Light blue | White | Cream |
On dark fabric, reverse the usual logic: the outline can be the brighter shade, because it is the contrast with the cloth that makes the edge crisp.
Projects for a Small Star
- A tree decoration. Stitch the star, back it with felt and add a hanging loop, using the same finishing steps as the Christmas tree cross stitch ornament.
- A row of stars. Repeat the motif three or five times in a line, leaving the same number of empty squares between each, for a nursery banner or a shelf edging.
- A scattered sky. Combine one large star with a few smaller shapes from the set of mini cross stitch motifs on dark fabric.
- A gift tag. On 18-count the star is small enough to mount on a folded tag.
Before finishing, hold the piece up to a window with the back toward you. Loose tails and carried threads show as shadows; trim or re-secure them, then press the work face down on a towel.
Frequently asked questions
Is a star harder to stitch than a heart?
Slightly, because every edge is a diagonal and the points are narrow. The stitches themselves are the same full crosses, so the only extra skill is careful counting. The mirrored halves of this chart make it easy to check each row.
Can the star be stitched on dark fabric?
Yes, gold on navy or charcoal looks striking. Work in strong light, and consider placing a white cloth on your lap so the holes in the dark Aida are easier to see.
Does the star need the outline?
On a light background the outline is what separates the pale yellows from the cloth, so it is worth keeping. On dark fabric you can stitch the outline squares in the fill color instead for a softer, solid star.