How to Read a Cross Stitch Chart
Squares, symbols, the key, center arrows and ten-square grid lines: what every part of a cross stitch chart means and how to follow one without losing your place.

At a glance
Materials
- A printed working copy of your chart
- Pale highlighter or pencil
- Ruler or strip of paper to mark the current row
- 14-count Aida with 3 in (8 cm) spare on each side of the design
- Size 24 tapestry needle and floss in the colors listed in the key
A cross stitch pattern is not a drawing to trace; it is a map. Once you know how to read a cross stitch chart, any design becomes a set of plain instructions: this color, this many squares, in this position. The parts of a chart are the same almost everywhere, so learning them once is enough for nearly every pattern you will meet.
One Square Equals One Stitch
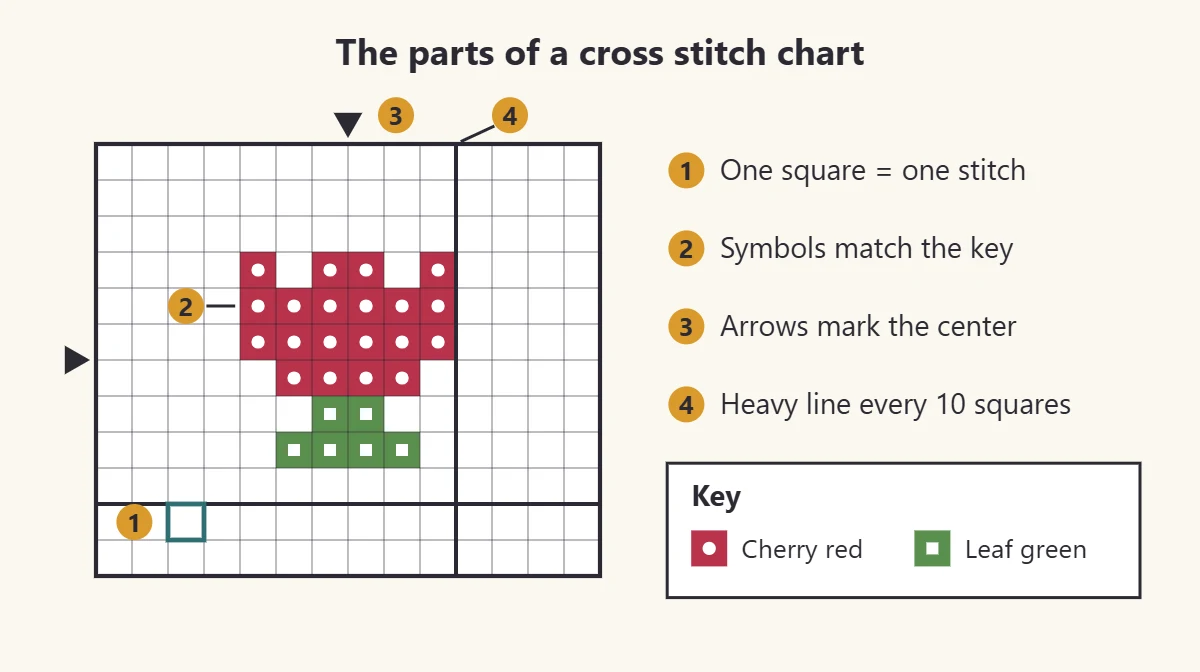
A chart is a grid of small squares. Each square stands for one full cross stitch worked over one block of Aida fabric. A square with something in it is a stitch; an empty square is bare fabric.
Nothing on the chart tells you how big the finished piece will be in inches. The chart only fixes the number of stitches. The size depends on the fabric, as the Aida fabric guide explains: divide the stitch count by the fabric count to get inches.
Symbols, Colors and the Key
Every filled square carries a symbol, a color, or both. The key, sometimes called the legend, is the list that translates them into thread.
- Symbol charts use a different mark for each thread color, such as a dot, a slash or a small triangle. They print clearly in black and white.
- Color charts fill each square with a color close to the thread. They are quick to read at a glance, though similar shades can be hard to tell apart.
- Combined charts show a symbol on a colored square, which gives the advantages of both.
The key lists each symbol with the name of its color, and often the number of stitches or the number of strands to use. Read it before threading a needle. Printed chart colors are only an approximation, and two symbols that look alike at first, such as a filled circle and an open one, usually stand for two close shades.
Tip
Before starting, tape a short length of each thread next to its symbol on a printed key. Matching symbol to thread then takes a glance instead of a search.
Grid Lines Every Ten Squares
Charts have a heavier line after every tenth square, across and down. These lines divide the design into blocks of 10 x 10 squares, exactly like the bold lines on graph paper.
Their job is to make counting faster and safer. Counting 27 squares one by one invites mistakes; counting two heavy lines and seven more squares does not. Many charts also print numbers along the top and side at each heavy line, so any square can be found by its position, the way a town is found on a map grid.
Center Arrows and Where to Start
Look at the edges of the chart for two small arrows or triangles, one at the top and one at the side. Follow each one straight into the chart. The point where the two lines meet is the center of the design.
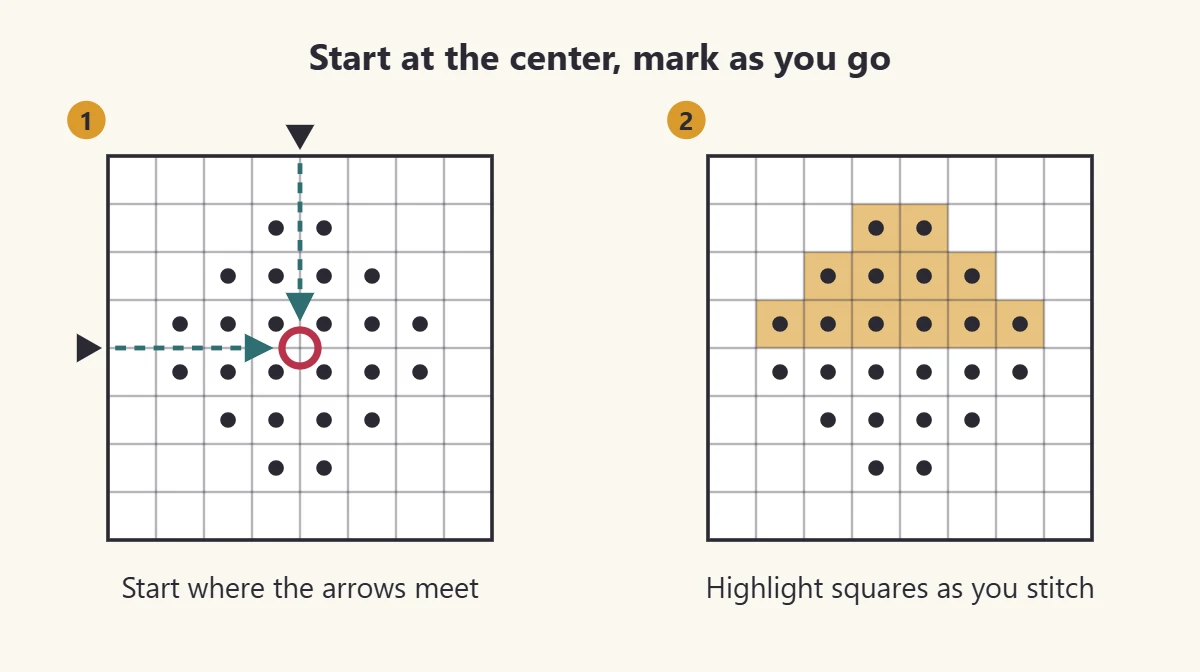
Starting at the center is the usual advice because it guarantees the design sits in the middle of the fabric with equal margins all around.
- Fold the fabric in half, then in half again the other way, and note the point where the folds cross.
- Find the center of the chart from the arrows.
- If the center square of the chart is empty, count from the center to the nearest stitched square, then count the same number of blocks on the fabric.
- Begin stitching there and work outward, one area of color at a time.
Starting at a corner or the top edge is also possible, but then the position of the first stitch has to be measured carefully from the fabric edges. Counting out from the center, and keeping count across gaps, is covered step by step in counting cross stitch.
Other Marks You May See
Full crosses make up most charts, but a few other marks turn up regularly.
| What the chart shows | What it means |
|---|---|
| A symbol or color filling a square | One full cross stitch in that color |
| An empty square | Bare fabric; no stitch |
| A solid line along or across squares | Backstitch, worked after the crosses |
| A symbol filling half a square diagonally | A fractional stitch for a smoother edge |
| A dot or small circle on a line or corner | A knot stitch or a bead, as the key states |
| Arrows or triangles at the edges | The center lines of the design |
Lines drawn over the grid are the most common of these. They show outlines and fine details and are stitched last, on top of the finished crosses; the method is in backstitch in cross stitch. A chart’s own key always has the final word on what its marks mean.
Following the Chart as You Stitch
The chart shows where stitches go, not the order in which to make them. A few habits keep the work accurate.
- Work one color at a time in one area. Stitch all the nearby squares of a symbol before changing thread.
- Read in rows. Count how many squares of the color sit side by side, stitch that many, then check the row above or below against the stitches just made.
- Use finished stitches as landmarks. It is more reliable to count a short distance from something already stitched than a long distance from the edge.
- Keep the chart the same way up as the fabric. Turning one and not the other is an easy way to stitch a section sideways.
Watch out
Count the empty squares too. Most misplaced stitches come from skipping across a gap by eye instead of counting it, and a single square of drift carries through everything stitched afterward.
Marking Your Progress
On anything larger than a tiny motif, marking the chart as you go saves a great deal of recounting.
- Use a working copy. Print or copy the chart for your own use and keep the original clean.
- Highlight finished squares. A pale highlighter leaves the symbols readable. Mark each row or block as soon as it is stitched, not at the end of the session.
- Enlarge if needed. A bigger copy is easier on the eyes and leaves room for notes.
- Mark your place. A ruler, a strip of paper or a magnetic board with a guide strip keeps the current row in view.
If something still ends up in the wrong place, it is rarely a disaster. The usual causes and their fixes are collected in common cross stitch mistakes. For a first small chart to practice on, the blossom in how to start cross stitch is only a few rows tall.
Frequently asked questions
What do the symbols on a cross stitch chart mean?
Each symbol stands for one thread color. The key beside the chart lists every symbol with its color, so a square showing that symbol is stitched as one full cross in that thread. The symbols themselves have no fixed meaning from one chart to the next.
Do I have to start a cross stitch chart in the center?
No, but it is the safest choice. Starting where the center arrows meet, at the center of the fabric, keeps the design in the middle with even margins. Starting elsewhere works if the position of the first stitch is measured carefully.
What are the darker lines on a cross stitch chart?
The heavier grid lines fall after every tenth square, both across and down. They break the chart into blocks of ten so that long distances can be counted in tens instead of one square at a time.
How do I keep my place on a chart?
Work from a copy and highlight squares as soon as they are stitched. A ruler or strip of paper under the current row helps as well. Marking little and often is more dependable than trying to remember where a session ended.


