Cross Stitch Tension: How to Get Even, Flat Stitches
How firmly to pull each stitch, how a hoop changes things, why floss twists, and how to fix puckered fabric or loose stitches.

At a glance
Materials
- 14-count Aida with 3 in (8 cm) spare on each side
- Size 24 tapestry needle
- Six-strand cotton floss, cut to about 18 in (45 cm)
- Embroidery hoop a little larger than the design (optional)
Two pieces stitched from the same chart, in the same floss, can look quite different, and the reason is usually cross stitch tension: how firmly each stitch is pulled as it is made. Even tension gives plump, uniform crosses and a flat fabric. Uneven tension shows up as puckers, stretched holes or loops that sit proud of the surface. Tension is a matter of habit rather than talent, and a few adjustments make a visible difference.
What Good Tension Looks Like
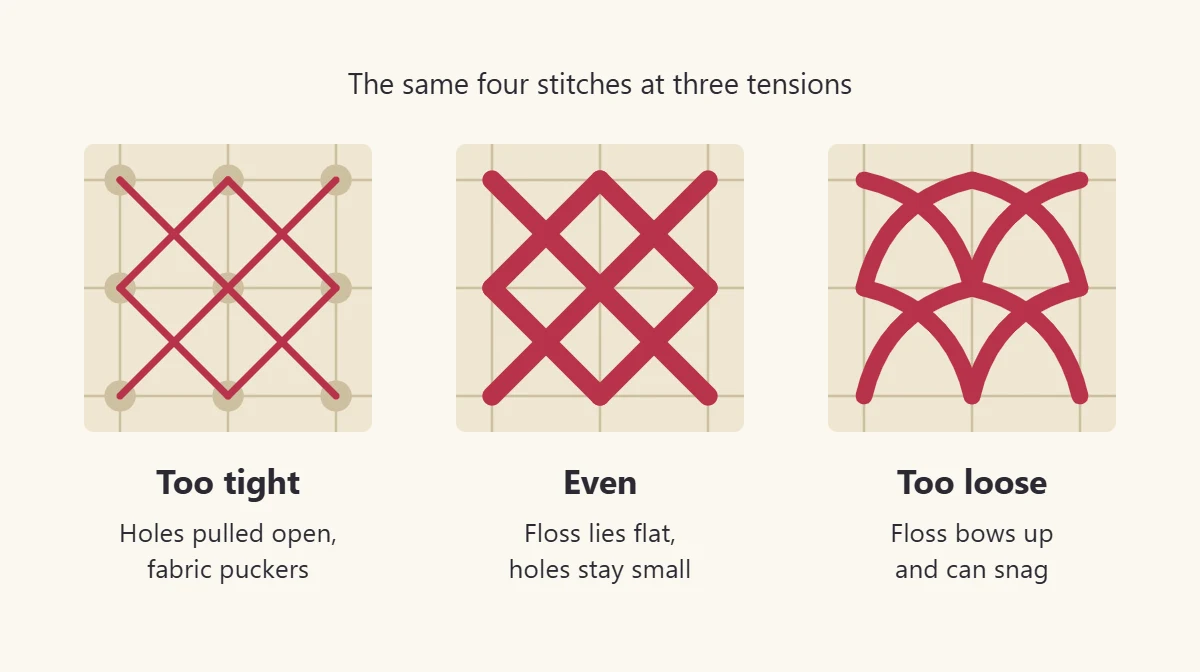
A well-tensioned cross lies flat against the fabric and fills its block. The floss is not stretched thin, the holes at the corners of the block stay their natural size, and the fabric between stitches is not pulled in. When you run a fingertip over a stitched area, it feels smooth and even, with no stitch standing higher than its neighbors.
How Hard to Pull
Pull each stitch until the floss rests on the fabric, then stop. That is the whole rule. The thread should lie on the surface, not press into it.
- Pull in a smooth motion rather than a tug, and slow down for the last inch or so of thread.
- Pull the thread in the direction the stitch travels, so it lies along the diagonal instead of dragging sideways against the hole.
- Give every stitch the same pull, including the first and last stitch of each thread, which tend to be tighter than the rest.
- Stitch at a steady pace. Tension often tightens when you rush and loosens when you are tired.
If stitches look thin however gently you pull, the cause may be too few strands for the fabric rather than tension. Two strands are usual on 14-count and 16-count Aida, three on 11-count. The embroidery floss guide lists strand counts for each fabric.
Hoop or In Hand
Both ways of working produce even stitches. They simply ask for different habits.
| In a hoop or frame | In hand | |
|---|---|---|
| How the fabric is held | Stretched flat and taut | Held loosely or rolled in the hand |
| Stitching motion | Stab method: needle down, then up, in two movements | Often the sewing method: down and up in one scooping movement |
| Effect on tension | The taut fabric resists the pull, so stitches are less likely to pucker | Easy to pull too tight, since nothing holds the fabric flat |
| Things to watch | Hoop marks, and crushing stitches under the ring | Fabric distorting along the diagonal |
In a hoop, tighten the fabric until it is firm and flat, with the Aida blocks still square rather than stretched into rectangles. Re-tighten when it slackens. Take the work out of the hoop when you stop for the day, so the ring does not leave a lasting crease. Stiff Aida holds its shape well enough to be worked in hand, which is one reason it suits beginners; the Aida fabric guide describes how different fabrics behave.
When the piece is finished, a hoop can also serve as the frame. That is a separate job with its own steps, covered in how to finish cross stitch in a hoop.
Why Floss Twists, and How to Stop It
Each stitch turns the needle slightly in your fingers, and those small turns add up. After a dozen stitches the strands wind around each other like a cord. Twisted floss looks thinner, covers the fabric less well and is more likely to knot.
- Let the needle hang. Every so often, turn the work over and let the needle dangle freely. The thread unwinds by itself in a few seconds.
- Use a shorter length. About 18 in (45 cm) is a good working length. Longer threads twist more and wear thin from passing through the fabric so many times.
- Separate the strands first. Pull each strand out of the cut length one at a time, then lay them back together. Strands that have been separated and recombined lie side by side instead of clinging in a twist.
- Roll the needle. If you notice the thread winding up as you stitch, roll the needle a quarter turn the opposite way between finger and thumb.
Railroading
Railroading is a way of making two strands lie flat and parallel, like the rails of a track, instead of crossing over one another. It gives the fullest coverage and the smoothest surface.

- Bring the needle up and pull the thread through as usual.
- Lay the two strands flat on the fabric along the line of the stitch.
- Put the tip of the needle between the two strands, then down into the hole.
- Pull through gently. The strands settle on either side of the point where the needle went in and lie next to each other.
It slows the stitching, so many people railroad only the top leg of each cross, which is the one that shows. It is an optional refinement, not a requirement.
Tip
A needle that is too thick forces the holes open and makes stitches look loose around the edges. Size 24 suits 14-count Aida and size 26 suits 16- and 18-count; see cross stitch needles for the full list.
Fixing Puckered Fabric
Puckering means the stitches are pulling the fabric in. The stitched area looks slightly gathered, and the holes around it are enlarged.
- While stitching: ease off the pull straight away. If only the last few stitches are tight, slide the needle under each leg and lift it very slightly to loosen it, working back toward the start of the thread.
- If it is in hand: try a hoop for the rest of the project. Taut fabric makes over-pulling much harder.
- Check the back: a thread carried tightly across a gap on the back draws the fabric together. Snip it, secure both ends and restitch if needed.
- After stitching: mild puckering often relaxes when the piece is dampened, eased gently back into shape and pressed face down on a thick towel. Severe puckering does not press out, and the affected stitches need to be reworked.
Fixing Loose Stitches
A loose stitch stands above its neighbors or shows a small loop. To tighten one, find it on the back, slide the needle under the thread and draw the slack along toward the end of that length, stitch by stitch, until it can be taken up where the thread was finished. If the end has already been trimmed short, run a new single strand under nearby stitches on the back and through the loose stitch’s thread to hold it down.
Loose stitches usually come from one of three things: fabric that has gone slack in the hoop, a thread that was not pulled fully through on the back, or a loop caught behind the work. Glancing at the back every few rows catches all three.
Watch out
Do not try to rescue tight stitches by stretching the finished fabric hard. It distorts the weave and the crosses stay thin.
Over-pulling is one of several habits covered in the roundup of common cross stitch mistakes, each with its own fix.
Frequently asked questions
Do I need a hoop to get even tension?
No. Aida is stiff enough to stitch in hand, and plenty of stitchers get even results that way. A hoop simply makes it harder to pull too tight, so it is worth trying if your fabric tends to pucker.
Is railroading necessary?
It is optional. Railroading makes two strands lie side by side for a smoother, fuller stitch, but neat work is possible without it. A common compromise is to railroad only the top leg of each cross.
Why does my thread keep twisting?
The needle rotates slightly with every stitch, and the turns build up along the thread. Letting the needle hang freely for a few seconds lets it unwind. Shorter working lengths and separating the strands before threading both reduce the problem.
Will washing and pressing fix puckered cross stitch?
Light puckering often eases when the piece is dampened, shaped gently and pressed face down on a towel. Fabric that has been drawn in hard by very tight stitches will not flatten fully, and those stitches need to be redone.