Common Cross Stitch Mistakes and How to Fix Each One
The slips most beginners make in cross stitch, from mixed top legs to fabric cut too small, with a practical fix for each.
At a glance
Materials
- 14-count Aida with 3 in (8 cm) spare on each side
- Size 24 tapestry needle
- Six-strand cotton floss, cut to about 18 in (45 cm)
- Small sharp scissors for unpicking
- A working copy of the chart to mark off finished stitches
Nearly everyone who learns to stitch runs into the same handful of problems, and most of them can be put right with a small change of habit. This guide goes through the common cross stitch mistakes one at a time: how to recognize each, why it happens, and the fix. None of them means a piece is ruined, and all of them are easier to prevent than to repair.
Mixing the Direction of the Top Leg
A full cross is two diagonal legs, one laid over the other. When the top leg slants one way in some stitches and the other way in others, light reflects off them differently and the surface looks patchy, even if every stitch is in the right place.
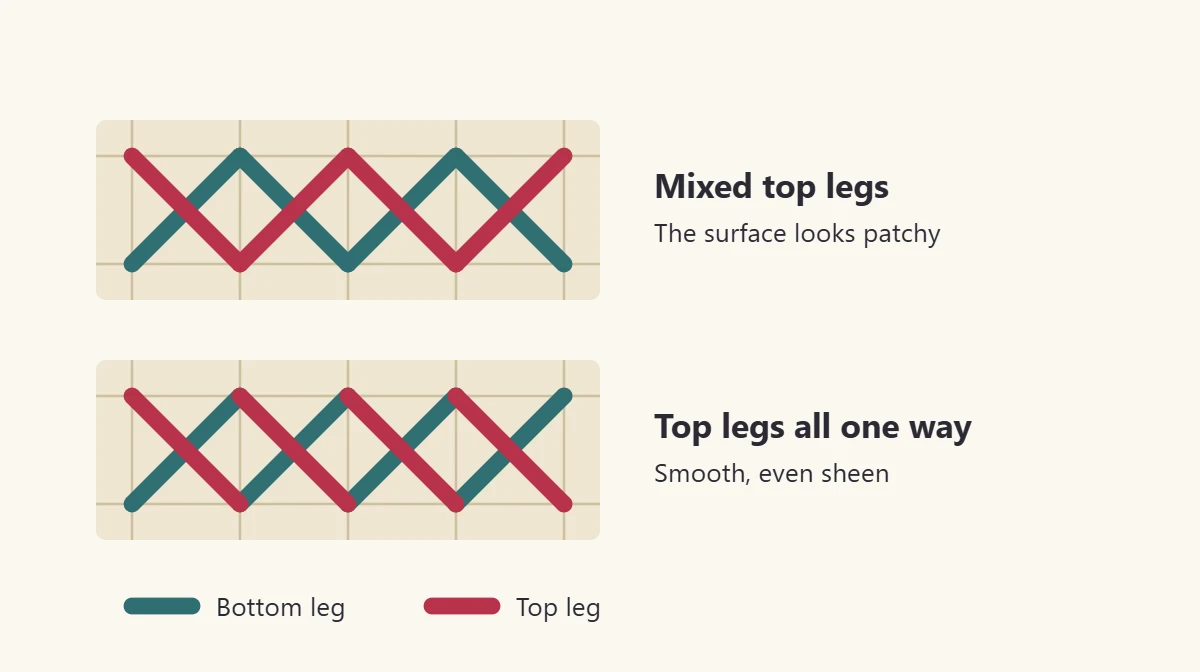
The fix: choose a direction and keep it for the whole piece. A common choice is to stitch the bottom leg from lower left to upper right and the top leg from lower right to upper left. The mirror image is just as correct; what matters is that it never changes.
- Be careful after turning the fabric to reach an awkward corner. Turning it a quarter turn reverses the slant.
- Check the direction against a finished stitch whenever you pick the work up again.
- A few reversed stitches can be unpicked and redone. Lift the legs out with the eye end of the needle.
Miscounting
A stitch placed one square out seems minor until the next section fails to line up with it. Miscounts usually happen when jumping across empty fabric, or when holes are counted instead of blocks.
The fix: stop as soon as something does not match the chart, and trace back to the last stitch you are sure of. Unpick from there. To prevent it, mark off finished stitches on a copy of the chart, count in small groups and work outward from stitched areas rather than leaping across gaps. The full method, including gridding, is in the guide to counting cross stitch.
Watch out
Do not keep stitching and hope a miscount evens out. Everything counted from the wrong stitch is wrong too, so the repair only grows.
Knots and Long Tails on the Back
Knotting the end of the thread feels secure, but knots make lumps that show when the piece is pressed or framed, and they can pop through the holes in Aida. Long, untrimmed tails cause a different problem: they get caught in later stitches and drag fuzz of the wrong color to the front.
The fix: secure threads under stitches instead. Begin with a loop start, a waste knot or a tail held under the first few stitches, and end by sliding the needle under three or four stitches on the back before trimming. Each method is shown in how to start and finish a thread. If a piece already has knots, slide the tail under nearby stitches where there is enough length, then snip the knot off.
Cutting the Thread Too Long
A long thread looks like a time-saver because it needs re-threading less often. In practice it tangles, twists and knots, and the floss frays from being pulled through the fabric again and again, so the last stitches look thinner and duller than the first.
The fix: cut working lengths of about 18 in (45 cm), roughly the distance from fingertips to elbow. If a knot forms anyway, do not pull it tight. Slip the needle tip into the loop and ease it open. A thread that has gone fuzzy should be ended and replaced.
Using the Wrong Number of Strands or the Wrong Needle
Floss comes as six strands that are meant to be separated. Stitching with all six on 14-count Aida crowds the holes and distorts the fabric; a single strand leaves the cloth showing through each cross.
| Aida count | Strands for crosses | Tapestry needle |
|---|---|---|
| 11 | 3 | Size 22 |
| 14 | 2 | Size 24 |
| 16 | 2 | Size 26 |
| 18 | 1 or 2 | Size 26 |
The fix: match strands and needle to the fabric count before the first stitch. A sharp sewing needle is also a mistake here, because it pierces the threads of the fabric and splits floss already stitched; a blunt tapestry needle finds the holes by itself. More detail on separating strands is in the embroidery floss guide.
Cutting the Fabric Too Small
This mistake is discovered late, when the design reaches the edge of the cloth or there is nothing left to fold around a mount. It comes from guessing the size, or from forgetting that the same chart finishes at different sizes on different counts.
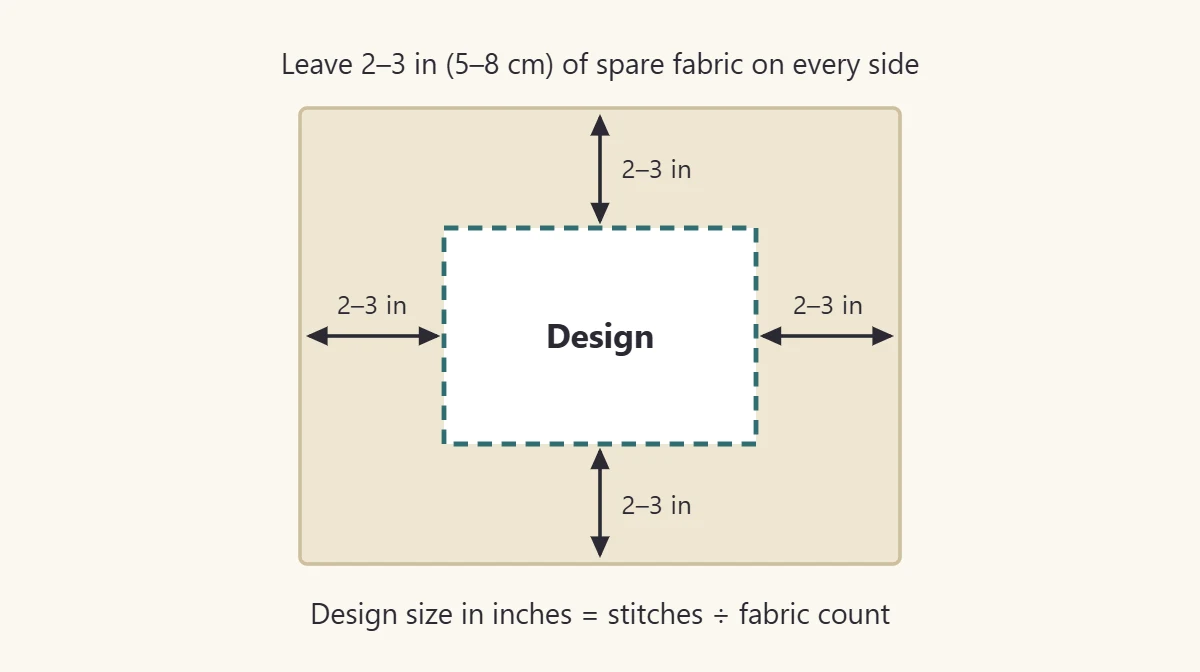
The fix: calculate before cutting.
- Divide the number of stitches by the fabric count to get the size in inches. A design 42 stitches wide on 14-count Aida is 42 ÷ 14 = 3 in (7.6 cm) wide.
- Do the same for the height.
- Add 2–3 in (5–8 cm) of spare fabric to every side, which means adding 4–6 in (10–15 cm) to each measurement.
- Start stitching from the center so the margins come out equal.
Counts, sizes and edge preparation are explained further in the Aida fabric guide. If a piece in progress turns out short on one side, it can sometimes be saved by sewing a strip of plain cotton to that edge to give the framer something to hold.
Pulling Too Tight and Carrying Thread
Stitches pulled too tight
Tight stitches stretch the holes, thin the floss and pucker the fabric. It tends to happen when stitching in hand, or when concentrating hard on a tricky area.
The fix: pull only until the floss rests on the fabric. Working in a hoop helps, because taut fabric resists the pull. The guide to cross stitch tension covers twisting floss, puckering and loose stitches in detail.
Thread carried across empty fabric
Jumping from one area to another without ending the thread leaves a strand running across the back. Behind stitched areas this is harmless. Behind bare fabric, especially with dark floss on pale Aida, it shows from the front as a shadowy line, and a tight carry pulls the fabric in.
The fix: carry a thread only a short distance, about three or four blocks, and only behind existing stitches where possible. For anything longer, finish the thread and start again.
Tip
Turn the work over every few rows. Tangles, loops, loose tails and carried threads are all visible on the back long before they cause trouble on the front.
A Quick Checklist Before You Stitch
- Fabric cut with spare cloth on every side, and the center marked.
- Correct number of strands and a blunt needle of the right size.
- Thread about 18 in (45 cm) long.
- Top-leg direction decided.
- No knots: start and finish under the stitches.
- Clean hands and good light.
Frequently asked questions
Does it matter which way the top leg of a cross stitch slants?
Neither direction is wrong. What matters is consistency: every top leg in the piece should slant the same way so the surface reflects light evenly.
How do I unpick cross stitch without damaging the fabric?
Work backward one stitch at a time, lifting each leg with the eye end of the needle rather than the point. For a larger area, snip the stitches on the front with fine scissors and draw the pieces out from the back, keeping the blades away from the fabric threads.
Can a mistake be left in the finished piece?
Sometimes. A single misplaced stitch in an irregular shape, such as foliage, is rarely noticeable. Errors in borders, lettering and symmetric motifs are worth correcting because the parts will not line up otherwise.