Backstitch in Cross Stitch: Outlines, Lettering and Fine Details
What backstitch adds to a cross stitch design, how to work it one block at a time, and the order to follow for clean outlines and lettering.
At a glance
Materials
- 14-count Aida with 3 in (8 cm) spare on each side
- Size 24 tapestry needle
- Six-strand cotton floss: two strands for crosses, one strand for backstitch
- A dark floss color for outlines, matched from your stash
- Small sharp scissors
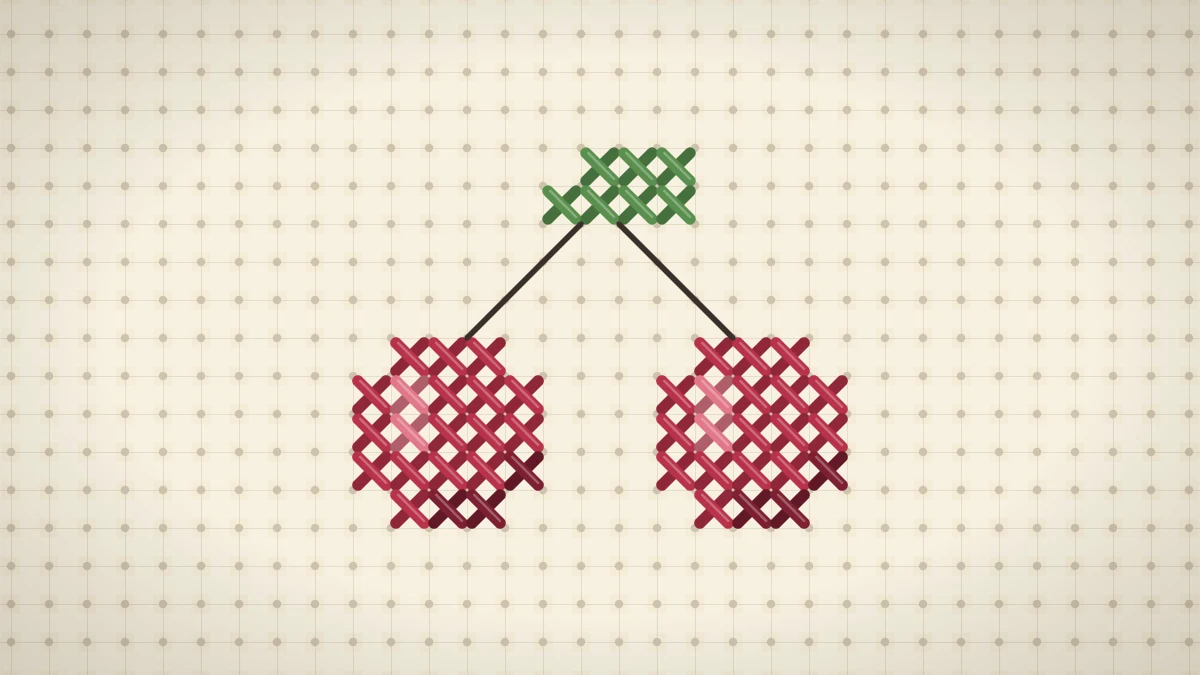
A design made only of crosses is built from square blocks, a little like a mosaic. Backstitch in cross stitch is the fine line that goes on top: it draws an outline around a shape, adds a stem, a whisker or a window frame, and spells out letters too small for full crosses. It is a simple stitch, usually worked in a single strand, and it is normally the last thing added to a piece.
What Backstitch Is For
- Outlines. A thin dark line around a pale shape separates it from the fabric and from neighboring colors.
- Details. Stems, antennae, legs, veins on a leaf, the rim of a cup: anything narrower than one block.
- Lettering. Names, dates and short phrases in a small space.
- Definition inside a shape. A line between two petals or the fold of a wing, where two similar shades meet.
Not every design needs it. Bold, graphic motifs often look best with no outline at all, and backstitch marked as optional on a pattern can be left out. The honey bee pattern, for example, can be stitched with or without its fine lines.
How Backstitch Appears on a Chart
Cross stitches are shown as filled or symbol-marked squares. Backstitch is drawn as a solid line that runs along the edges of the squares or across them, from corner to corner. Each corner on the chart is a hole in the Aida, so the line shows exactly which holes the thread connects. The key lists the color for each line. For a refresher on symbols and keys, see how to read a cross stitch chart.
Strands and Needle
Backstitch is usually worked with one strand of floss, even where the crosses use two. One strand gives a crisp line that sits neatly on top of the crosses. Two strands make a heavier line, useful for bold lettering or an outline meant to stand out, but they can look thick against fine detail. If a pattern specifies a number, follow it.
Use the same blunt tapestry needle as for the crosses. A single strand slips out of a large eye easily, so keep the working length to about 18 in (45 cm) and leave a generous tail through the needle. The embroidery floss guide explains how to separate one strand cleanly.
How to Work Backstitch
The name describes the motion. Each stitch on the front travels backward to meet the previous one, while the needle moves forward underneath the fabric.

- Secure the thread on the back under existing cross stitches.
- Bring the needle up one stitch length ahead of where the line begins (1).
- Take it down at the beginning of the line (2). That is the first stitch.
- Bring the needle up one stitch length beyond the end of the first stitch (3).
- Take it down into the same hole where the first stitch ended (4), so the two stitches share a hole and form an unbroken line.
- Repeat: up one length ahead, back down into the end of the last stitch.
On Aida, one stitch length is normally one block: one hole to the next, along an edge or diagonally across a block. Keeping each stitch to a single block makes curves and corners follow the chart closely.
Longer stitches
Some charts show a line that runs straight over two blocks or more, or slants across two squares in one direction and one in the other. A long single stitch gives a smoother slant than several short steps. Limit a stitch to a length that lies flat; a very long one sits loose on the surface and can catch. For a long straight line, break it into stitches of one or two blocks.
Outlining: Order and Route
Finish all the cross stitches in an area before adding any backstitch. Backstitch lies on top of the crosses; if it goes in first, later crosses cover and distort it.
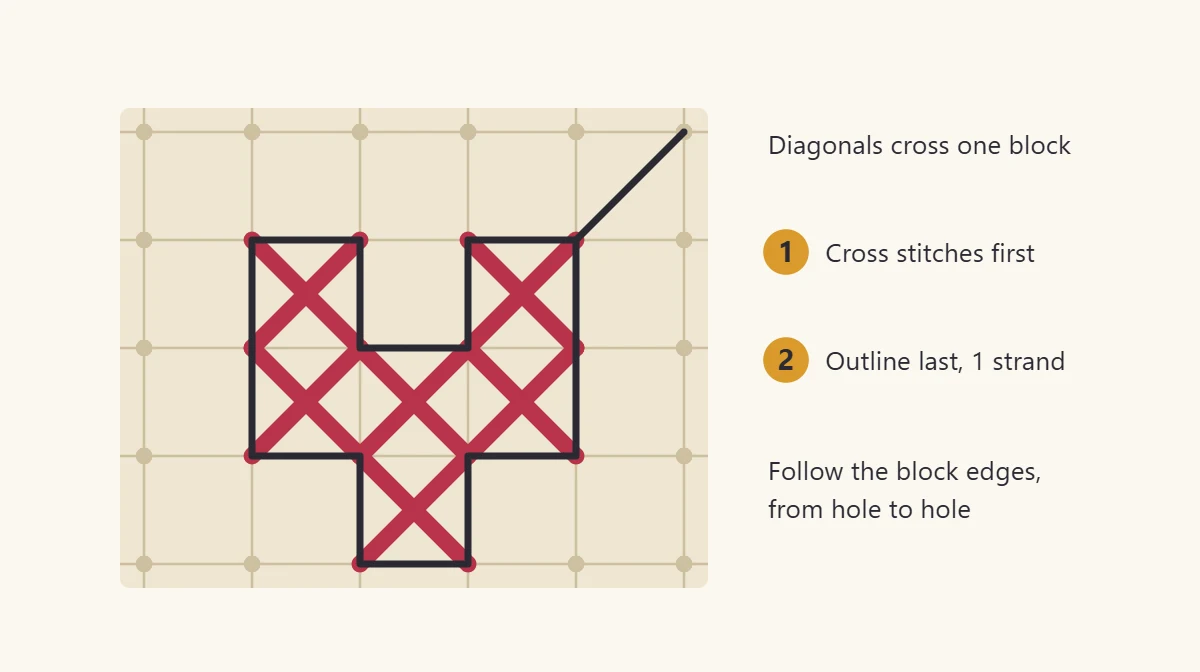
A sensible order for the backstitch itself:
- Work the cross stitches, color by color.
- Add backstitch inside shapes, such as veins and folds.
- Outline each shape, traveling around it in one continuous route where possible.
- Stitch lettering and isolated details last.
Plan the route before you begin so the thread does not have to jump. If two lines are more than a few blocks apart, end the thread and start again rather than carrying it across the back. A dark single strand carried behind pale fabric is easy to see from the front. The method for securing each end is described in how to start and finish a thread.
Tip
At a sharp corner, finish the stitch exactly in the corner hole and begin the next one from that same hole. The corner stays pointed instead of rounding off.
Lettering and Fine Details
Backstitched letters can be much smaller than letters built from crosses, because a line can cross a block diagonally or run along its edge. A few points keep lettering readable:
- Count the full width of the word on the chart, including the spaces between letters, and center it before the first stitch. Lettering that drifts to one side is very noticeable.
- Keep spacing consistent. One block between letters and three between words is a common arrangement for small text.
- Choose a color with strong contrast against the fabric. Pale thread on pale fabric disappears.
- Stitch each letter as one continuous route where its shape allows.
For larger names and monograms, letters made from full crosses are bolder. The modern block alphabet is charted that way.
Common Backstitch Problems
| Problem | Likely cause | Fix |
|---|---|---|
| Line looks wobbly | Stitches of uneven length, or the needle splitting the floss of the crosses | Keep to one block per stitch and use the fabric holes, not the threads |
| Line sinks between the crosses | Thread pulled too tight | Ease off so the line rests on the surface |
| Line looks heavy | Too many strands | Use a single strand |
| Shadow showing through the fabric | Thread carried across the back | End the thread and restart at the next line |
| Gaps between stitches | Needle not returning to the previous hole | Always go down where the last stitch ended |
Watch out
Backstitch is hard to unpick without disturbing the crosses beneath it. Check the position of each line against the chart before stitching it.
Because a single strand shows every change in pull, even pressure matters more here than anywhere else in a design. The same light, steady hand that keeps crosses even also keeps a backstitched line straight.
Frequently asked questions
Should backstitch be done before or after the cross stitches?
After. Backstitch sits on top of the crosses, so the crosses in that area need to be complete first. On a large piece it is fine to backstitch one finished section before moving on to stitch the next.
How many strands should I use for backstitch?
One strand is the usual choice and gives a fine, crisp line on 14-count Aida. Two strands make a bolder line for prominent lettering or heavy outlines. Follow the pattern if it states a number.
Can I skip the backstitch on a pattern?
Often, yes. Where it is described as optional, the design is meant to read without it. Where backstitch forms essential parts such as stems, faces or text, leaving it out removes those details, so check the chart before deciding.