Pumpkin Cross Stitch Pattern
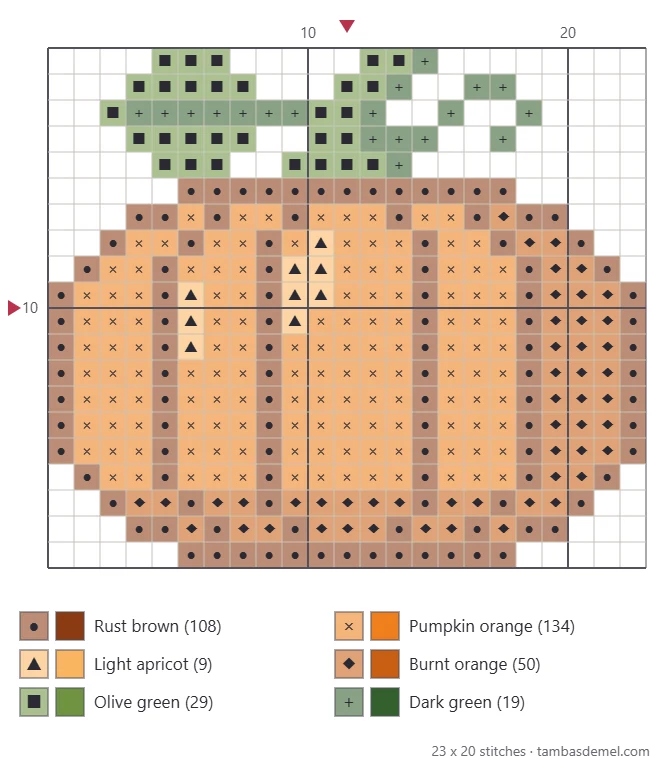
An original autumn pumpkin with rounded ribs, a highlight, a leaning stem, a leaf and a curling tendril, stitched entirely in full crosses.

At a glance
Materials
- 14-count cream Aida with 3 in (8 cm) spare on each side of the design
- Size 24 tapestry needle
- Stranded cotton floss in rust brown, three oranges (light, mid and burnt) and two greens
- Small sharp embroidery scissors
- Embroidery hoop, 5 or 6 in (13 or 15 cm), optional
- Printed chart and a pencil or highlighter for marking progress
When the evenings draw in, a pumpkin is the motif that says autumn faster than any other. This original pumpkin cross stitch pattern is a plump, slightly squat pumpkin with curved ribs, a leaning stem, one leaf and a curling tendril. It measures 23 x 20 stitches, uses 6 colors and is worked entirely in full crosses.
The shading does most of the work. A light apricot highlight sits on the upper left, burnt orange darkens the right side and the base, and rust brown lines mark the outline and the ribs. Together they turn a flat orange oval into something round.
Pattern Summary
- Size: 23 x 20 stitches, which is 1.6 x 1.4 in (4.1 x 3.6 cm) on 14-count Aida.
- Stitches: 349 full cross stitches.
- Colors: 6: one brown, three oranges and two greens.
- Level: easy. Most of the design is solid filling inside an outline.
The body of the pumpkin is the same on the left and right apart from the shading. The stem, leaf and tendril on top are deliberately uneven, which keeps the motif lively.
Materials
- 14-count cream Aida with 2–3 in (5–8 cm) of spare fabric on every side
- Size 24 tapestry needle
- Stranded cotton floss in the six colors of the key
- Small sharp scissors
- An embroidery hoop, optional
Cream and white fabric both set off the orange well. A natural oatmeal Aida gives a rustic harvest look, though the light apricot highlight will be a little less visible on it. New to the supplies? The first-day guide on how to start cross stitch goes through each item.
The Chart
One square on the chart equals one cross stitch. The arrows at the edges mark the center column and row, and every tenth grid line is heavier to make counting easier.
Color Key
The colors are named, not numbered. Pick the nearest shades from your own floss. Line up the three oranges before starting and make sure they form clear steps from light to dark.
| Symbol | Color | Stitches |
|---|---|---|
| ● | Rust brown | 108 |
| × | Pumpkin orange | 134 |
| ▲ | Light apricot | 9 |
| ◆ | Burnt orange | 50 |
| ■ | Olive green | 29 |
| + | Dark green | 19 |
The rust brown should be darker than the burnt orange, or the ribs on the shaded side will blur into the filling. If the two look alike in your stash, choose a deeper brown for the outline.
Finished Size on Each Fabric
| Aida | Finished design | Fabric to cut (3 in spare per side) |
|---|---|---|
| 11-count | 2.1 x 1.8 in (5.3 x 4.6 cm) | 8.5 x 8 in (21.6 x 20.3 cm) |
| 14-count | 1.6 x 1.4 in (4.1 x 3.6 cm) | 8 x 7.5 in (20.3 x 19.1 cm) |
| 16-count | 1.4 x 1.3 in (3.6 x 3.3 cm) | 7.5 x 7.5 in (19.1 x 19.1 cm) |
| 18-count | 1.3 x 1.1 in (3.3 x 2.8 cm) | 7.5 x 7.5 in (19.1 x 19.1 cm) |
Use 2 strands of floss on 14-count and 16-count, 3 strands on 11-count, and 1 or 2 strands on 18-count. A solid block of color like this pumpkin looks best with full coverage, so 2 strands is the better option on 18-count.
How to Stitch the Pumpkin
The quickest route is to build the rust brown framework first and then fill each section like a coloring book.
- Find the center. Fold the fabric in half both ways. The crossing of the folds matches the crossing of the chart’s center arrows, which falls inside the pumpkin’s middle section.
- Stitch the two inner ribs. Count from the center to the nearest rib on each side and work both lines of rust brown from top to bottom. They curve inward by one stitch at each end.
- Add the outer ribs and the outline. Work outward to the next pair of ribs, then stitch the outline all the way around. The top and bottom edges are straight rows; the sides step in at the corners to round the shape.
- Fill with pumpkin orange. Work each section in rows. With the ribs in place there is very little counting left.
- Add the highlight and shadow. Stitch the light apricot squares in the upper part of the middle and left sections, then the burnt orange in the right-hand section and along the base.
- Stitch the stem. It rises from the top center and leans to the right. Use olive green with a dark green shadow down its right edge.
- Stitch the leaf. Work the dark green vein first, from the stem out to the left, then fill the olive green above and below it.
- Finish with the tendril. The dark green curl to the right of the stem is a handful of single stitches that touch at their corners.
Tip
For the orange filling, work each row as a line of half crosses and complete them on the way back. In a large area of one color, any top leg that slants the wrong way catches the light differently, and this method keeps them all consistent.
Order of the oranges
Some stitchers prefer to place the small areas of light apricot and burnt orange before the main orange, so the filling flows around them. Either order works. What matters is not leaving single empty squares behind; scan each section against the chart before moving on. The page on common cross stitch mistakes lists the slips that are easiest to make in filled areas.
Watch out
The tendril stitches are isolated. Secure the thread well under the back of the stem stitches before starting, and do not trail dark green across open fabric to reach the leaf on the other side. End the thread and start again.
Optional details
The chart is complete without any outlining, but a few additions are possible:
- Backstitch outline: a single strand of dark brown worked around the body sharpens the edge. The method is explained in the guide to backstitch in cross stitch.
- A second leaf: mirror the leaf onto the right side in place of the tendril.
- Ground line: one or two rows of soft brown or straw yellow under the pumpkin anchor it on the fabric.
Color Variations
| Version | Outline and ribs | Body | Highlight | Shadow |
|---|---|---|---|---|
| Classic orange | Rust brown | Pumpkin orange | Light apricot | Burnt orange |
| White pumpkin | Warm gray | Cream | White | Pale tan |
| Sage pumpkin | Deep gray-green | Soft sage | Pale mint | Mid gray-green |
| Golden squash | Chestnut brown | Golden yellow | Pale lemon | Mustard |
The white version needs a colored fabric to show. For the sage version, change the stem and leaf to a brown so they do not merge with the body.
Ways to Use It
- Fall hoop: center the pumpkin in a small hoop for a shelf or door decoration.
- Pumpkin patch: stitch three in a row in different colorways, leaving a few empty columns between them.
- Seasonal card: work it on 16-count or 18-count Aida for a card front or place card.
- Autumn pair: stitch it beside the mini mushroom pattern for a woodland theme.
- Year-round set: keep it with the Christmas tree ornament as the start of a collection of seasonal motifs.
Before mounting, wash the finished piece gently in lukewarm water, roll it in a towel and press it face down on a soft surface so the stitches stay raised.
Frequently asked questions
Is this pumpkin pattern good for beginners?
Yes. It uses only full cross stitches, and most of the design is solid blocks of orange that are simple to fill once the outline is in place. The curling tendril is the only part made of single scattered stitches, and it can be left out without spoiling the design.
Can the pumpkin be stitched in other colors?
It can. A white pumpkin with pale gray ribs works on a colored fabric, and a soft sage or blue-gray pumpkin suits a muted autumn palette. Keep three tones for the body and one darker shade for the outline and ribs.
What can I make with a small pumpkin motif?
It suits a small hoop, a fall greeting card, a patch for a tote bag or the corner of a table napkin. Stitched on a higher fabric count it becomes small enough for a gift tag or a hanging decoration.
