Christmas Tree Cross Stitch Ornament
An original three-tier Christmas tree with a gold star and colored baubles, plus step-by-step instructions for finishing it as a flat hanging ornament.

At a glance
Materials
- 14-count cream Aida with 3 in (8 cm) spare on each side
- Size 24 tapestry needle
- Stranded cotton floss in gold, pine green, dark green, berry red, bright blue and bark brown
- Stiff card or mount board
- Thin batting or a layer of felt for padding (optional)
- Felt for the back
- Strong sewing thread and a sharp sewing needle
- About 8 in (20 cm) of narrow ribbon
- Scissors, pencil and ruler
A handmade decoration is small enough to finish well before the holidays and personal enough to come out of the box year after year. This Christmas tree cross stitch ornament is an original design: a three-tier evergreen with a gold star on top, red, blue and gold baubles, a short trunk and a red pot. The chart is 21 x 27 stitches with 249 full crosses in 6 colors, and the second half of this page shows how to turn the stitched piece into a flat, felt-backed ornament with a ribbon loop.
About the Design
The tree is perfectly symmetric, with the trunk and the tip of the star on the center line.
- Star. A five-pointed gold star: one stitch at the top, a wide row for the arms and two separate stitches for the lower points.
- Three tiers. Each tier of pine green starts narrow and widens row by row, then ends in a full row of dark green. That darker row works like a shadow under the branches and makes the tiers look layered.
- Baubles. Single stitches of berry red, bright blue and gold are scattered across the branches, including one gold bauble on the center line of the middle tier.
- Trunk and pot. A short bark brown trunk stands in a berry red pot with a wider rim.
What You Need
For the stitching
- 14-count cream Aida, cut with 3 in (8 cm) of spare fabric on every side of the design
- A size 24 tapestry needle
- Stranded cotton floss in gold, pine green, dark green, berry red, bright blue and bark brown
- Small sharp scissors
For the finishing
- Stiff card or mount board
- Thin batting, or a spare piece of felt, for padding (optional)
- Felt for the back, in a color that suits the tree
- Strong sewing thread and a sharp sewing needle
- About 8 in (20 cm) of narrow ribbon
- Pencil, ruler and scissors
Use two strands of floss on 14-count Aida. Do not trim the spare fabric yet: the margin is what wraps around the card later. If you are choosing between fabric counts, the Aida fabric guide explains how each one changes the finished size.
The Chart
One square is one cross stitch. The arrows show the center lines, and the heavier grid lines fall every ten squares.
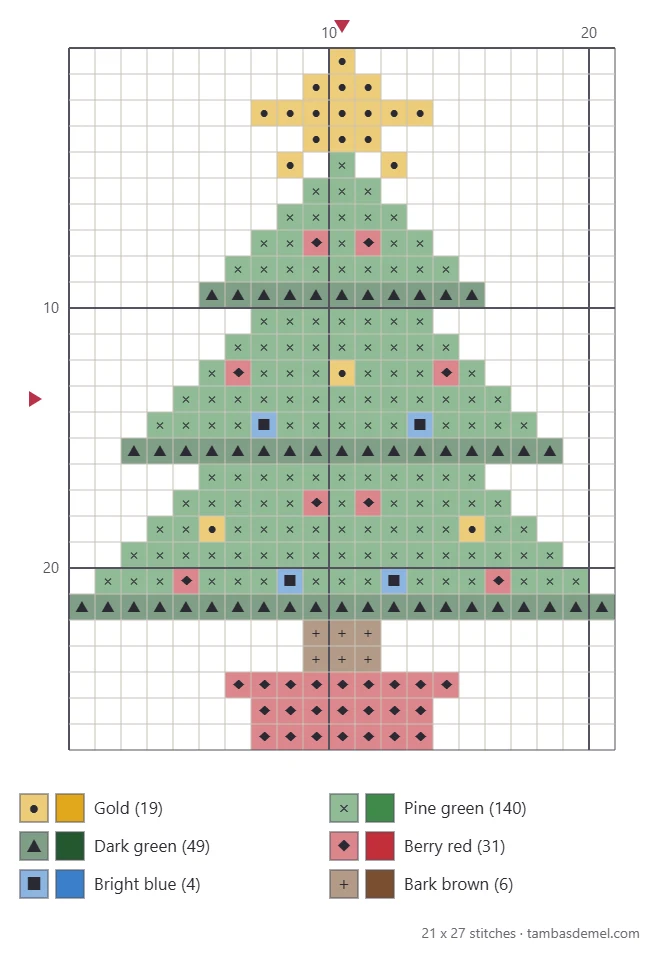
| Symbol | Color | Stitches |
|---|---|---|
| ● | Gold | 19 |
| × | Pine green | 140 |
| ▲ | Dark green | 49 |
| ◆ | Berry red | 31 |
| ■ | Bright blue | 4 |
| + | Bark brown | 6 |
Pick the floss from your own collection by name. The two greens should be clearly different, a fresh mid green and a deep forest shade, so that the dark rows show. The gold needs to be a strong, warm yellow to stand out against cream fabric.
Finished Size
On 14-count Aida the stitched tree measures 1.5 x 1.9 in (3.8 x 4.8 cm). The ornament itself will be a little larger, because it includes a border of plain fabric around the tree.
| Aida | Finished design | Fabric to cut (3 in spare per side) |
|---|---|---|
| 11-count | 1.9 x 2.5 in (4.8 x 6.4 cm) | 8 x 8.5 in (20.3 x 21.6 cm) |
| 14-count | 1.5 x 1.9 in (3.8 x 4.8 cm) | 7.5 x 8 in (19.1 x 20.3 cm) |
| 16-count | 1.3 x 1.7 in (3.3 x 4.3 cm) | 7.5 x 8 in (19.1 x 20.3 cm) |
| 18-count | 1.2 x 1.5 in (3 x 3.8 cm) | 7.5 x 7.5 in (19.1 x 19.1 cm) |
How to Stitch the Tree
- Find the center. Fold the fabric in half both ways. The center of the chart is in the middle tier, close to the gold bauble on the center line.
- Stitch the middle tier. Work the pine green rows outward from the center, leaving empty squares for the baubles. Finish the tier with its dark green row.
- Stitch the top tier and star. Count up from the middle tier. The top tier begins with a single green stitch on the center line, tucked between the two lower points of the star.
- Stitch the bottom tier. This is the widest part of the tree. Its dark green row spans the full width of the design.
- Add the trunk and pot. The trunk is two rows of brown, the pot three rows of red with a wider top row.
- Drop in the baubles. Fill each empty square with its color. They are single stitches, so start each one by holding the tail under nearby green stitches on the back.
Tip
Each tier grows by one stitch on each side per row. If a row does not line up one square beyond the row above on both edges, stop and recount before going further.
Running a thread end under three or four stitches is all it takes to secure it. Knots are worth avoiding in any project, but especially here: the back of the work will be pressed flat against card, and a knot makes a bump you can see from the front. The article on starting and finishing a thread shows the knot-free methods.
How to Finish It as a Hanging Ornament
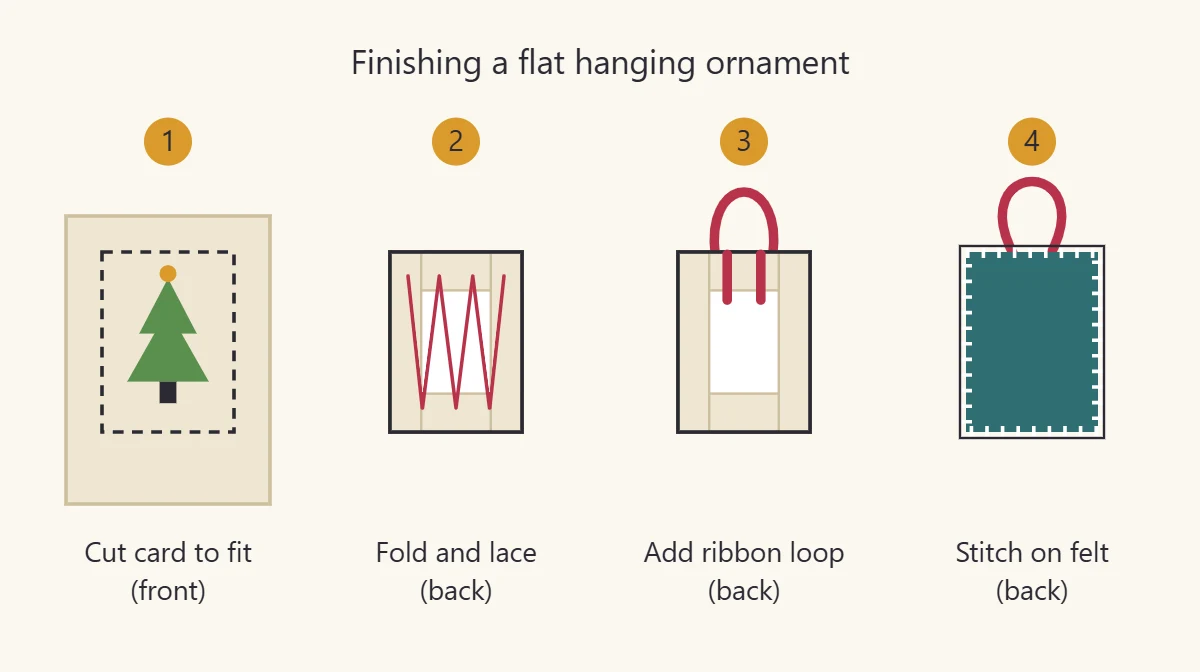
This method makes a firm, flat ornament with a neat felt back. It uses lacing, the same idea used to mount needlework for framing, on a small scale.
- Press the stitching. Lay it face down on a folded towel and press from the back so the stitches keep their shape.
- Cut the card. Decide how much plain fabric you want around the tree; about 1/2 in (1.3 cm) on each side looks balanced. Measure the stitched tree, add the border and cut a rectangle of card to that size. Cut a piece of batting the same size if you want a softly padded front.
- Center the design. Place the stitching face down, lay the batting and then the card on top, and check from the front that the tree is centered and upright. The rows of Aida holes should run parallel to the edges of the card.
- Trim the fabric. Cut the Aida so that about 1 in (2.5 cm) extends beyond the card on every side.
- Fold and lace. Fold the top and bottom margins over the card. With strong thread, lace back and forth between the two flaps in a zigzag and pull until the fabric is snug. Fold in the two side margins, tucking the corners neatly, and lace those in the same way.
- Attach the ribbon. Fold the ribbon into a loop and sew both ends firmly to the fabric at the top center of the back.
- Cover the back. Cut a piece of felt slightly smaller than the ornament. Pin it over the lacing and sew it to the folded fabric edge all the way around with small overcast stitches, catching the ribbon ends underneath.
Watch out
Check the front again before you tighten the lacing. Once the felt is sewn on, a tree that leans or sits off-center cannot be corrected without undoing the back.
Variations
- Snowy tree. Stitch on sky or sage Aida and replace the dark green rows with white for snow-laden branches.
- One-color baubles. Work every bauble in berry red for a traditional look, or all in gold.
- Dated ornament. Add the year or an initial beneath the pot using the block alphabet, and allow extra fabric and a taller card for it.
- Round finish. Mount the tree in a very small hoop instead of on card, following the steps for finishing cross stitch in a hoop.
For a matching set, the simple star motif can be finished in exactly the same way and hung beside the tree.
Frequently asked questions
Can I finish the ornament without sewing?
Yes. Fabric glue or double-sided tape can hold the folded edges to the back of the card and attach the felt. Lacing with thread takes longer, but it lets you adjust the fabric until the tree is straight and it avoids any risk of glue marking the front.
What shape should the ornament be?
A rectangle is the simplest because the folds are straight. An oval or a circle also suits the tree, but curved edges need small snips in the fabric margin, or a gathering thread, so that it folds smoothly.
Should I wash the stitching before finishing it?
If the fabric has hoop marks or has been handled a lot, a gentle hand wash in cool water and a press face down on a towel will freshen it. Make sure it is completely dry before mounting it on card.
Can I add beads or metallic thread?
Both work well. A bead sewn over each bauble stitch, or a strand of metallic thread blended with the gold for the star, adds sparkle. Add beads last so the working thread does not catch on them.