How to Start and Finish a Thread in Cross Stitch
Three reliable ways to begin a thread and one simple way to end it, all without leaving a knot in your cross stitch.
At a glance
Materials
- 14-count Aida with 3 in (8 cm) spare on each side
- Size 24 tapestry needle
- Six-strand cotton floss, used two strands at a time
- Small sharp scissors for trimming tails
Knowing how to start and finish a thread in cross stitch is what keeps the back of a piece flat and the front free of bumps. None of the standard methods uses a knot that stays in the work. Instead, the thread is trapped under the stitches themselves, which holds it firmly and adds no bulk. There are three reliable ways to begin and one simple way to end, and each takes only a few seconds once your hands know the moves.
Why Cross Stitch Avoids Knots
A knot seems like the obvious way to anchor a thread, but on Aida it causes more trouble than it solves. The reasons are practical:
- Bumps on the front. A knot is a hard lump. Once the piece is pressed, framed or mounted in a hoop, the lump shows through as a raised dot.
- Knots can pull through. The holes in Aida are large compared with a small knot, and a firm tug can drag it straight through to the front.
- Snagging. A needle traveling across the back catches on knots and loose ends, which tangles the working thread.
- Uneven tension. A knot fixes the thread at one hard point, so the first stitch often sits tighter than its neighbors.
A tail held under stitches spreads the hold over several stitches and lies completely flat.
The Loop Start
The loop start is the neatest beginning there is, and it leaves no tail at all. It works only when you stitch with an even number of strands, because it uses one strand folded in half to make two. That suits the two strands normally used on 14-count and 16-count Aida.
- Cut one length of floss about twice your usual working length, roughly 36 in (90 cm), and pull out a single strand.
- Fold the strand in half. Thread the two cut ends through the needle together, so the fold forms a loop at the far end.
- Bring the needle up from the back where the first stitch begins. Pull gently and stop while the loop is still hanging on the back.
- Make the first diagonal leg by taking the needle down through the fabric.
- On the back, pass the needle through the loop and pull until the loop closes snugly against the fabric.
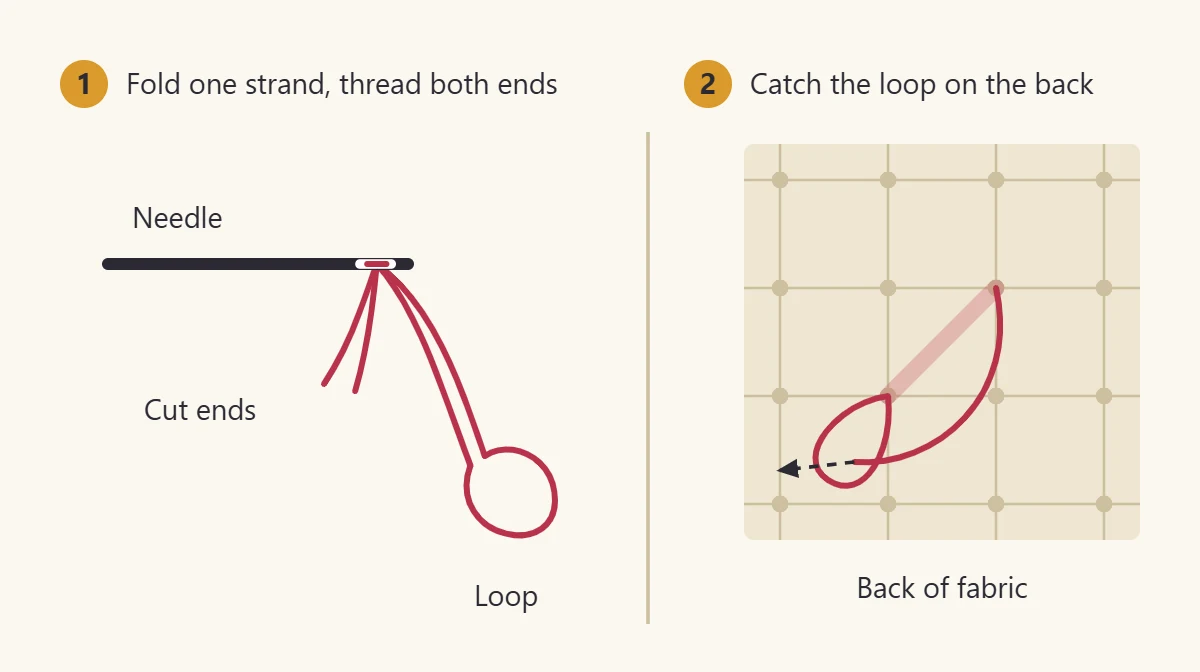
The thread is now locked in place and you can carry on stitching. If you are unsure how to pull single strands out of the skein without tangling, the guide to embroidery floss covers separating strands step by step.
Watch out
The loop start cannot be used with one or three strands. For an odd number of strands, choose the waste knot or the held tail instead.
The Waste Knot
A waste knot is a temporary knot that sits on the front of the fabric and is cut off once it has done its job. It works with any number of strands and is easy to control because you can see it.
- Tie a small knot at the end of the thread.
- Take the needle down from the front of the fabric about 1 in (2.5 cm) away from your starting point, in the direction your first stitches will travel. The knot stays on the front.
- Bring the needle up at the starting point and begin stitching toward the knot. On the back, each stitch crosses over the thread that runs from the knot.
- When the stitches reach the knot, lift it slightly and snip it off close to the fabric.
If the first row is very short, place the knot farther away in an empty area instead. After a few stitches, cut the knot off, thread the loose tail into the needle and run it under the stitches on the back.
Holding the Tail Under the First Stitches
This is the quickest method and needs no preparation. Bring the needle up from the back and leave a tail of about 1 in (2.5 cm) behind the fabric. Hold the tail against the back with a fingertip, pointing along the line you are about to stitch. As you work the first three or four stitches, check that each one passes over the tail and traps it. Then trim any excess.
The only difficulty is that it is done by feel. Turn the work over after the second stitch to confirm that the tail has been caught. If it slipped free, it is far easier to fix now than later.
How to Finish a Thread
Stop stitching while you still have about 3 in (8 cm) of thread left. Shorter than that and the needle becomes awkward to steer on the back.
- Take the needle to the back of the fabric.
- Slide it under the backs of three or four nearby stitches, keeping the needle flat against the fabric so it does not pierce the cloth or split the floss.
- Pull the thread through until it lies snug, without tightening the stitches.
- Trim the tail close to the fabric.
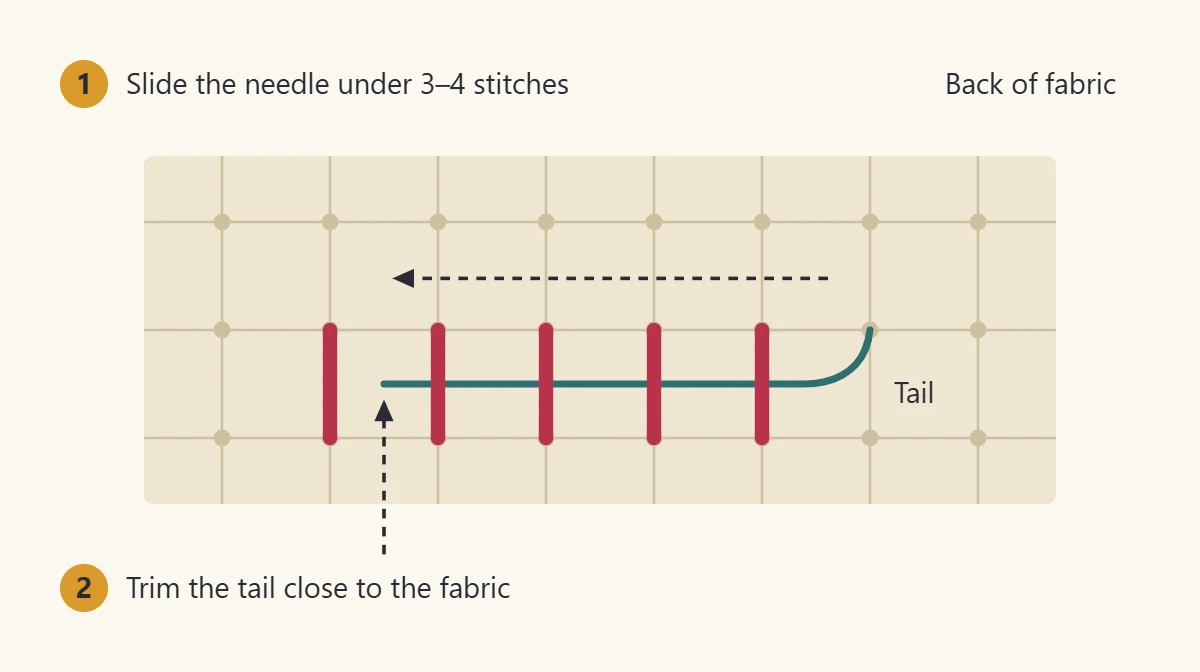
A blunt tapestry needle makes this much easier because it slips under the stitches instead of stabbing through them. See the notes on cross stitch needle sizes if yours feels too thick to pass under comfortably.
Tip
Where you can, bury a tail under stitches of the same or a similar color. A dark tail run behind pale stitches can show through as a faint shadow on the front.
Starting a New Thread Mid-Project
Once part of the design is stitched, there is an easier option: anchor the new thread under stitches that already exist. Slide the needle under three or four stitches on the back, next to where you want to begin, and pull through until the end of the thread just disappears under them. Hold the thread lightly for the first stitch so that it does not slip out. From then on it behaves like any other start.
The loop start still works in the middle of a project too, and many stitchers keep using it wherever they stitch with two strands.
Which Method to Use
| Method | Strands | Good for | Keep in mind |
|---|---|---|---|
| Loop start | Even numbers only | The very first stitch of a piece; a clean, flat back | Needs a strand cut twice as long |
| Waste knot | Any | Beginners who like to see what is happening | Remember to snip the knot |
| Held tail | Any | Quick starts in open fabric | Check the back after two stitches |
| Under existing stitches | Any | Every new thread once stitching is under way | Match colors where possible |
Small Habits That Keep the Back Tidy
- Trim tails as you go. Loose ends get caught in later stitches and are hard to remove afterward.
- Do not carry a thread across a wide empty gap to save a start. End it and begin again; long carried threads can show through and pull the fabric.
- Avoid burying many tails in the same spot, which creates a thick patch.
- Keep the pull gentle when you secure an end. Yanking it distorts the last stitch, which is one of the issues covered in the guide to cross stitch tension.
Leftover knots and long tails are among the common cross stitch mistakes that are simple to avoid from the first stitch. If you have not made that first stitch yet, the beginner guide to starting cross stitch walks through it with a small practice motif.
Frequently asked questions
Can I use a loop start with three strands?
No. The loop start depends on one strand folded in half, so it always produces an even number of strands. For three strands, as on 11-count Aida, use a waste knot or hold the tail under the first few stitches.
How many stitches should a tail pass under?
Three or four stitches is the usual guide and is enough to hold the thread on a piece that will be framed or hooped. For an item that will be handled or washed often, passing under a few more stitches adds security without adding noticeable bulk.
Is one small knot on the back really a problem?
A single knot will not ruin a piece, but it can show as a bump once the fabric is pressed or stretched, and it may slip through a hole in the Aida. Securing the thread under stitches takes about the same time and avoids both risks.
What should I do if the thread is too short to finish properly?
Take the thread off the needle, slide the empty needle under three or four stitches on the back, then thread the short end through the eye and pull it under. Next time, stop stitching while about 3 in (8 cm) of thread remains.


