Bluebird Cross Stitch Pattern
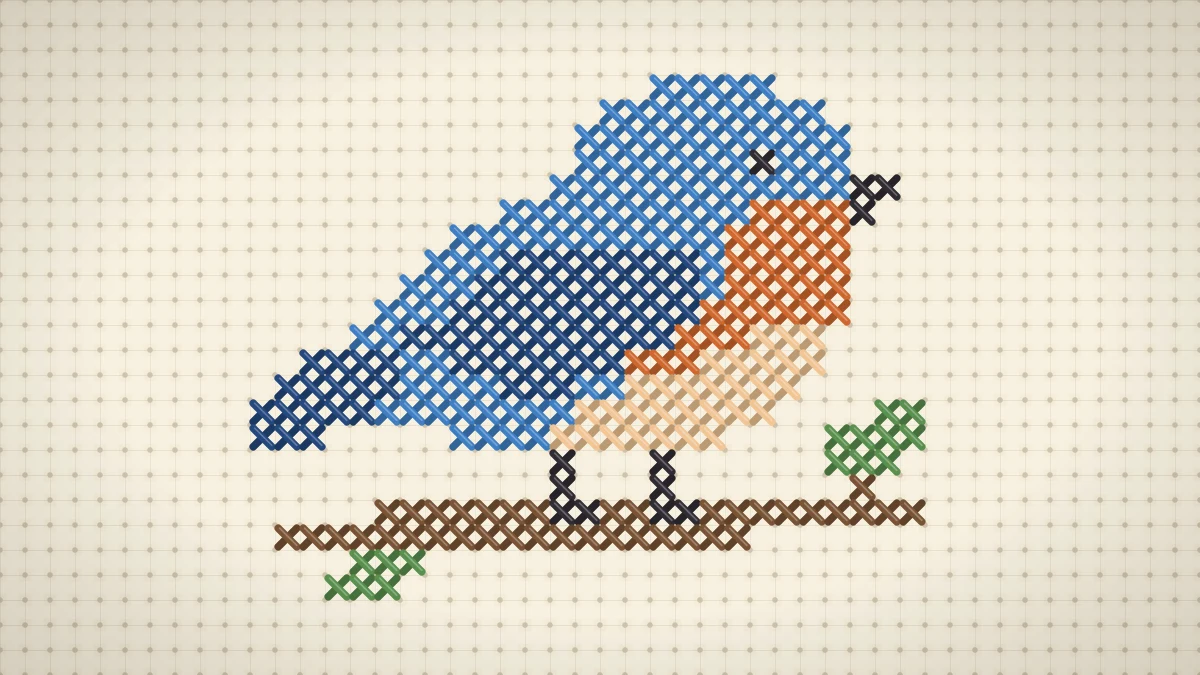
An original small songbird perched on a leafy twig, with a blue back, rust orange breast and pale belly, charted in seven colors.
At a glance
Materials
- 14-count cream Aida with 3 in (8 cm) spare on each side
- Size 24 tapestry needle
- Stranded cotton floss in bright blue, deep blue, rust orange, pale apricot, charcoal, twig brown and leaf green
- Small sharp scissors
- 5 in (13 cm) embroidery hoop (optional)
Small birds are a classic needlework subject because a few well-placed colors are enough to suggest feathers, a bright eye and a round, alert posture. This bluebird cross stitch pattern shows an original songbird perched on a twig, looking to the right: blue head and back, a darker folded wing and tail, a rust orange breast and a pale belly. The design is 28 x 21 stitches, with 292 full crosses in 7 colors and no backstitch at all.
There are more color changes here than in a one- or two-color motif, so it suits a stitcher who has already finished a small project and wants something with a little shading.
About the Design
The bird is drawn in profile with the head high on the right and the tail sloping down to the left, which gives the whole motif a gentle diagonal. Each color has a single job:
- Bright blue covers the head, the back and the rump.
- Deep blue forms the folded wing across the middle of the body and the long tail feathers.
- Rust orange starts under the beak as a narrow throat and widens into the breast.
- Pale apricot fills the belly, curving under the orange.
- Charcoal is used sparingly for the eye, the short beak, the two thin legs and the toes that grip the twig.
- Twig brown and leaf green make the perch: a twig two rows thick that steps down toward the left, one leaf on a short stalk at the right-hand end and a second leaf hanging below on the left.
The eye is a single dark stitch. On a bird this small, one stitch surrounded by blue reads as bright and lively; anything larger starts to look heavy.
What You Need
- 14-count cream Aida, cut with 3 in (8 cm) of spare fabric on every side of the design
- A size 24 tapestry needle
- Stranded cotton floss in bright blue, deep blue, rust orange, pale apricot, charcoal, twig brown and leaf green
- Small sharp scissors
- An embroidery hoop, if you like to use one
Two strands of floss give good coverage on 14-count fabric. With seven colors on the go, it helps to cut a length of each before you start and keep them in order; a working length of about 18 in (45 cm) is long enough to be useful and short enough not to tangle.
The Chart
Each square is one cross stitch. The arrows at the edges point to the center lines, and the heavier lines every ten squares help you count across the wider rows. If charts are new to you, how to read a cross stitch chart walks through symbols, keys and center marks.
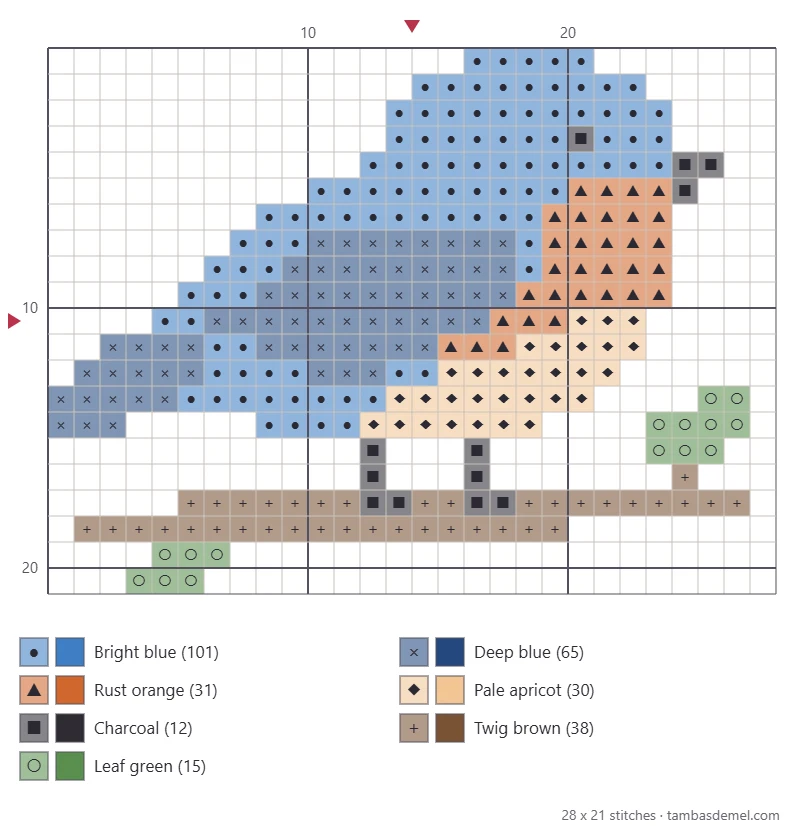
| Symbol | Color | Stitches |
|---|---|---|
| ● | Bright blue | 101 |
| × | Deep blue | 65 |
| ▲ | Rust orange | 31 |
| ◆ | Pale apricot | 30 |
| ■ | Charcoal | 12 |
| + | Twig brown | 38 |
| ○ | Leaf green | 15 |
Choose your floss by eye. The two blues need to be far enough apart that the wing shows against the back: lay the skeins side by side and squint, and if they blur into one color, pick a darker shade for the wing. The pale apricot should be clearly lighter than the rust orange but still darker than the fabric.
Finished Size
On 14-count Aida the finished bird and twig measure 2 x 1.5 in (5.1 x 3.8 cm).
| Aida | Finished design | Fabric to cut (3 in spare per side) |
|---|---|---|
| 11-count | 2.5 x 1.9 in (6.4 x 4.8 cm) | 8.5 x 8 in (21.6 x 20.3 cm) |
| 14-count | 2 x 1.5 in (5.1 x 3.8 cm) | 8 x 7.5 in (20.3 x 19.1 cm) |
| 16-count | 1.8 x 1.3 in (4.6 x 3.3 cm) | 8 x 7.5 in (20.3 x 19.1 cm) |
| 18-count | 1.6 x 1.2 in (4.1 x 3 cm) | 8 x 7.5 in (20.3 x 19.1 cm) |
Stitching Order
Mark the center of the fabric by folding it in half both ways. On this chart the center falls inside the deep blue wing, which is the best place to start: the wing is a solid block and every other color touches it or sits close by.
- Wing. Stitch the deep blue wing in horizontal rows, working from the center outward. Each row shifts one square to the left as the wing slopes down toward the tail.
- Back and head. Change to bright blue and work upward from the top of the wing. The rows shorten in steps as they climb to the rounded crown. Leave the single eye square empty.
- Breast. Stitch the rust orange, beginning with the narrow throat beside the beak and working down. The right-hand edge of the breast is almost vertical for several rows, which gives the bird its puffed-out chest.
- Belly. Fill in the pale apricot beneath the orange. The bottom rows get shorter from both ends to round off the underside.
- Tail and rump. Add the deep blue tail feathers at the far left and the bright blue stitches that connect them to the body.
- Charcoal details. Stitch the eye, the beak, then the two legs. The toes are worked as part of the top row of the twig.
- Twig and leaves. Work the two brown rows, the short stalk and both leaves.
Tip
Finish each color in one area before picking up the next, and cross off the squares on a printed copy of the chart as you go. Where blue, orange and apricot meet in the same row, counting is quicker when the neighboring color is already stitched.
Counting across the gap
The legs are the only link between the bird and the twig, and they are just one stitch wide. Count them down from the belly row above instead of estimating by eye, then count the twig from the legs outward in both directions. The same applies to the right-hand leaf, which floats on its own to the side of the belly until the stalk joins it to the twig. A miscount here is the most likely mistake in the whole design, and the guide to counting across empty fabric has several ways to prevent it.
Watch out
Do not carry charcoal thread from the eye to the beak or from one leg to the other across the back. Dark thread behind pale apricot or bare cream fabric shows from the front. End the thread and start again.
Changing the Bird
The same outline can become a different garden bird with a change of floss.
| Bird | Head and back | Wing and tail | Breast | Belly |
|---|---|---|---|---|
| Robin-style | Warm brown | Dark brown | Red orange | Off-white |
| Finch-style | Golden yellow | Charcoal | Golden yellow | Pale yellow |
| Winter bird | Soft gray | Dark gray | Dusty rose | Pale pink |
These are color suggestions for a stylized motif, not accurate portraits of particular species. Whatever you choose, keep the eye and beak dark and the belly light.
Finishing and Display
The design is wider than it is tall, so it sits well in an oval hoop or a small rectangular frame. Leave more empty fabric above the bird than below the twig; the open space above the head makes the bird look as if it has sky around it.
For a spring piece, stitch a flower beneath the twig. The single tulip works well centered under the bird, and a ring of leaves from the floral wreath chart can frame it if you have enough fabric. Press the finished work face down on a towel so the stitches are not flattened.
Frequently asked questions
Is this bluebird pattern suitable for a beginner?
It is a step up from a first project because it uses seven colors and has several places where colors change within a row. A beginner who has finished one or two small motifs and is comfortable reading a chart should manage it without trouble.
Can I make the bird face left instead of right?
Yes. Read every row of the chart from right to left, or view a printed chart in a mirror. Stitching a second, flipped bird gives you a facing pair on the same twig.
What if I only have one shade of blue?
Stitch the wing and tail in the same blue as the body and the bird will still be recognizable. You lose the folded wing detail, so consider outlining the wing afterward with one strand of a darker thread.