Sitting Cat Cross Stitch Pattern
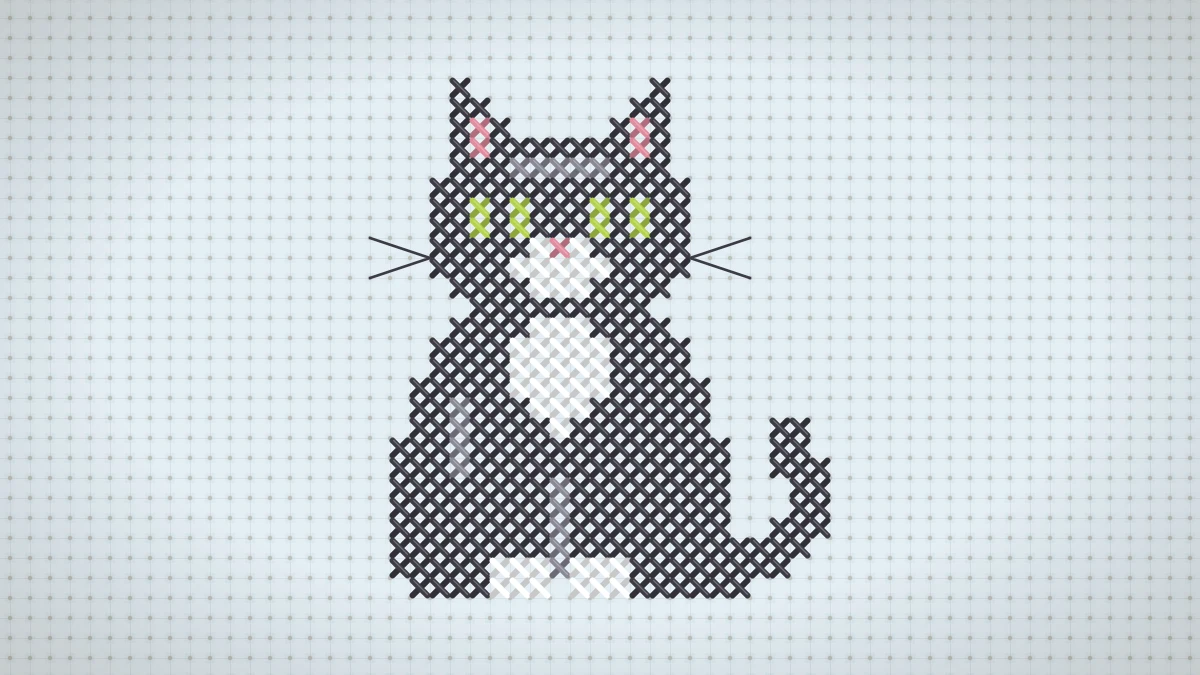
An original sitting cat with a white bib, green eyes and a curled tail, charted in five colors with optional backstitched whiskers.
At a glance
Materials
- 14-count sky blue Aida with 3 in (8 cm) spare on each side
- Size 24 tapestry needle
- Stranded cotton floss in charcoal, slate gray, white, rose pink and lime green
- Small sharp scissors
- 4 in or 5 in (10 or 13 cm) embroidery hoop (optional)
A cat sitting upright with its tail curled around its side is one of the easiest animal shapes to recognize, which makes it a rewarding subject for a small chart. This cat cross stitch pattern is an original design of 23 x 26 stitches: a charcoal cat facing forward, with a white bib and paws, pink ears and nose, and two green eyes. It uses 5 colors and 357 full cross stitches, plus four short backstitched whiskers that you can add or skip.
Most of the cat is one solid color, so the stitching settles into a steady rhythm once the outline is in place. The face is the only part that asks for careful counting, and it sits near the top where it is easy to check against the ears.
About the Design
The cat is drawn as a silhouette with a few details added on top, rather than as a realistic portrait. Three things keep it from looking like a plain dark block:
- Slate gray highlights. A band across the forehead, a line down the left shoulder and a single column between the front legs break up the charcoal and hint at fur catching the light.
- White markings. The muzzle, the bib on the chest and the two front paws give the body a clear front and stop the legs from disappearing.
- Bright eyes. Each eye is two lime green columns with a charcoal slit between them, the narrow pupil of a cat in daylight.
The chart is drawn for sky blue Aida. White thread needs a colored background to show, so a pale blue, sage or blush fabric suits this design better than white or cream.
What You Need
- 14-count Aida in a pale color, cut with 3 in (8 cm) of spare fabric on every side of the design
- A size 24 tapestry needle
- Stranded cotton floss in charcoal, slate gray, white, rose pink and lime green
- Small sharp scissors
- A small embroidery hoop if you like to work with the fabric held taut
On 14-count fabric, use two strands of floss for the cross stitches and one strand for the whiskers. If you want to know why those numbers change on other fabrics, the guide to Aida counts explains how the count affects both size and coverage.
The Chart
Each square on the chart is one cross stitch over one Aida block. The arrows on the edges mark the center lines, and the heavier grid lines fall every ten squares to help with counting.
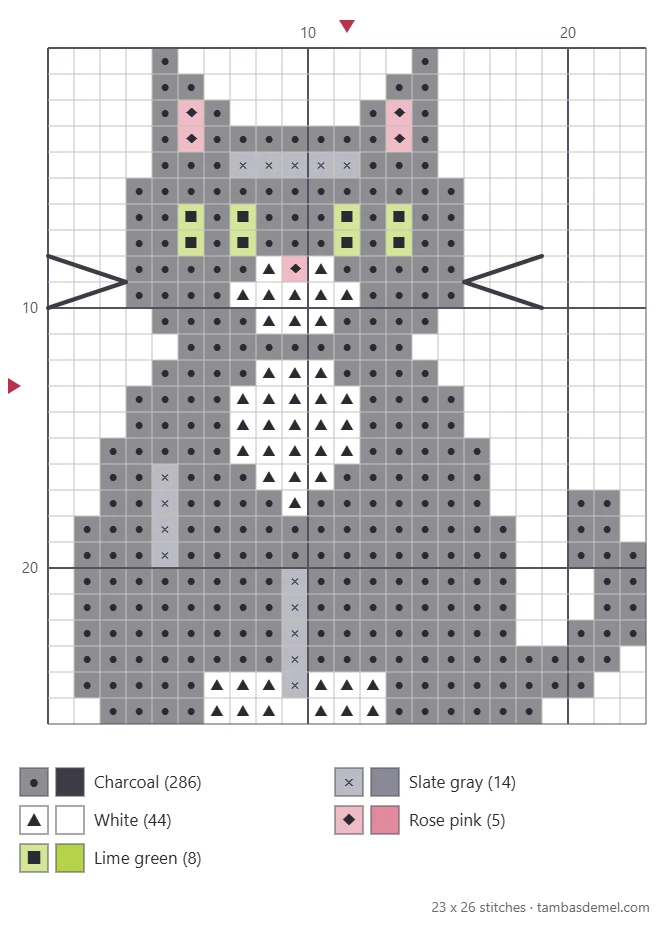
| Symbol | Color | Stitches |
|---|---|---|
| ● | Charcoal | 286 |
| × | Slate gray | 14 |
| ▲ | White | 44 |
| ◆ | Rose pink | 5 |
| ■ | Lime green | 8 |
Floss colors are given as plain names on purpose. Pick the closest shades from your own stash: any dark gray that is not quite black works for the coat, as long as the slate gray is visibly lighter when the two skeins lie side by side.
Finished Size
On 14-count Aida the cat measures 1.6 x 1.9 in (4.1 x 4.8 cm). The table shows the size on other counts and how much fabric to cut.
| Aida | Finished design | Fabric to cut (3 in spare per side) |
|---|---|---|
| 11-count | 2.1 x 2.4 in (5.3 x 6.1 cm) | 8.5 x 8.5 in (21.6 x 21.6 cm) |
| 14-count | 1.6 x 1.9 in (4.1 x 4.8 cm) | 8 x 8 in (20.3 x 20.3 cm) |
| 16-count | 1.4 x 1.6 in (3.6 x 4.1 cm) | 7.5 x 8 in (19.1 x 20.3 cm) |
| 18-count | 1.3 x 1.4 in (3.3 x 3.6 cm) | 7.5 x 7.5 in (19.1 x 19.1 cm) |
How to Stitch the Cat
Fold the fabric in half both ways and pinch the folds to find the center, then match it to the center arrows on the chart. The center of this design falls in the upper chest, in the charcoal just beside the bib, which is a comfortable place to begin.
- Start with the bib. Count from the center to the nearest white stitch and work the white chest area first. It is a small, distinctive shape that every other part of the body can be counted from.
- Fill the body in charcoal. Work in horizontal rows, stitching all the bottom legs across a row and then coming back with the top legs. Leave gaps for the slate gray stitches as you pass them; they are easier to fill in afterwards than to count around.
- Work up into the head. The neck is the narrowest row of the design. From there the head widens again, so count the first row of the cheeks carefully before you go on.
- Stitch the face. Put in the white muzzle and the pink nose first, then the green eyes. The two eyes are mirror images, each three stitches wide with the pupil in the middle column.
- Add the ears. Each ear is a small charcoal triangle with two pink stitches inside it. The outer edge of each ear rises straight up from the side of the head.
- Finish with the tail and paws. The tail joins the body at the lower right and climbs in a column two stitches wide. Work the white paws last, leaving one empty square between them on the bottom row.
Tip
Large areas of one dark color show uneven stitches more than patterned areas do. Keep every top leg slanting the same way across the whole cat, and let the needle hang now and then so the floss can untwist.
When you run out of thread, slide the needle under three or four stitches on the back and trim the end. Avoid carrying charcoal floss across the back of the white bib or behind bare fabric, because a dark thread can show through as a shadow. If you are unsure how to begin a length without a knot, the loop start and waste knot methods both work well here.
Adding the Whiskers
The whiskers are two small V shapes, one on each side of the face, worked in one strand of charcoal after all the crosses are done. Each line starts at a hole on the edge of the cheek, level with the muzzle, and runs outward across three squares while rising or falling by one square.
Because each whisker crosses several squares at a slant, work it as one long straight stitch from hole to hole rather than as a row of short backstitches. A long stitch stays crisp and looks like a single hair. The article on backstitch in cross stitch covers how to keep long stitches from sagging.
Watch out
Do not pull the whisker stitches tight. A long stitch that is pulled hard will pucker the pale fabric beside the face, and the dent is difficult to press out later.
Changing the Coat Color
The chart works with almost any coat as long as you keep one rule: the highlight shade must be lighter than the main shade, and the eyes must stand out from both.
| Cat | Main coat | Highlight | Eyes |
|---|---|---|---|
| Ginger | Burnt orange | Pale apricot | Leaf green |
| Gray | Medium gray | Silver gray | Golden yellow |
| Brown | Chocolate brown | Warm tan | Amber |
| All black | Black | Charcoal | Lime green |
For a cat with no white markings, stitch the bib, muzzle and paws in the main coat color and keep only the nose pink. For a white cat, reverse the idea: use white for the coat, pale gray for the highlights and choose a mid-toned fabric so the whole animal shows.
Ways to Use the Finished Cat
The design is tall and narrow, so it fits neatly into a small round or oval hoop with space left over beneath for a name. Letters from the block alphabet chart are a good match for the clean outline of the cat, and the steps for finishing a piece in a hoop take you from the last stitch to something ready to hang.
It also works on a greeting card with an aperture, on the pocket of a tote bag using waste canvas, or as one square in a sampler of animals. Stitched on 18-count fabric it becomes small enough for a gift tag.
Frequently asked questions
Can the cat be stitched on white or cream fabric?
Yes, but the white bib, muzzle and paws will blend into a white or cream background. Either choose a colored Aida such as pale blue, sage or blush, or swap the white floss for a soft pale gray so those areas still show.
Are the whiskers necessary?
No. The whiskers are a short backstitch detail added after all the cross stitches are finished. The cat reads clearly without them, so leave them off if you have not tried backstitch yet.
How do I change the cat to match my own pet?
Replace the charcoal with your cat's main coat color and choose a slightly lighter shade of the same color for the highlight stitches. Keep the eye and nose colors lighter or brighter than the coat so the face stays readable.