Tulip Cross Stitch Pattern
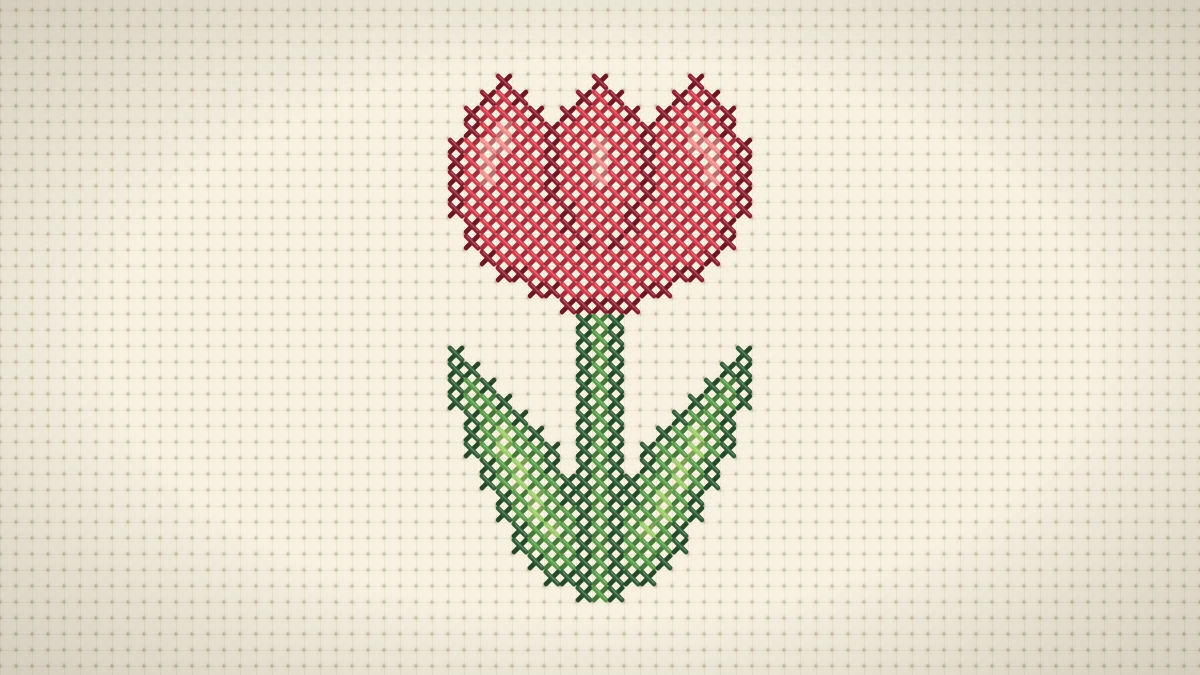
An original single tulip with a shaded red bloom, a sturdy stem and two long leaves. The design is symmetrical, so it is quick to count and forgiving for newer stitchers.
At a glance
Materials
- 14-count cream Aida with 3 in (8 cm) spare on each side of the design
- Size 24 tapestry needle
- Stranded cotton floss in three reds (deep, mid and light) and three greens (dark, mid and light)
- Small sharp embroidery scissors
- Embroidery hoop, 5 or 6 in (13 or 15 cm), optional
- Printed chart and a pencil or highlighter for marking progress
A single tulip is one of the most satisfying flowers to chart: a cup of three petals, a straight stem and two long leaves are enough for anyone to recognize it at a glance. This original tulip cross stitch pattern measures 19 x 33 stitches and uses 6 colors, with a dark outline that keeps the petals crisp and a light highlight that makes the bloom look rounded instead of flat.
Every stitch is a full cross. There is no backstitch, no fractional stitch and no blended thread, so the whole design can be worked with the basic stitch alone.
The Design at a Glance
The tulip stands upright with one petal in front and one tucked behind it on each side. Below the bloom, a stem with a dark edge and a lighter core runs to the bottom of the design, and a leaf rises on each side of it, leaning slightly outward at the tip.
- Size: 19 x 33 stitches, which comes to 1.4 x 2.4 in (3.6 x 6.1 cm) on 14-count Aida.
- Stitches: 387 full crosses in 6 colors.
- Symmetry: the left half is a mirror image of the right half, with a single center column running through the front petal and the stem.
- Level: easy. Careful counting is needed only for the petal outline.
Because the two halves match, a miscount is easy to spot: if the left leaf and the right leaf do not end on the same row, one of them has drifted.
Materials
- 14-count cream Aida, cut with 2–3 in (5–8 cm) of spare fabric on every side of the design
- Size 24 tapestry needle
- Stranded cotton floss in the six colors listed in the key below
- Small sharp scissors
- An embroidery hoop, if you prefer to stitch with the fabric held taut
Cream fabric gives the reds a warm, slightly vintage look. White Aida makes them brighter and cooler. Both work; avoid pink or red fabric, where the bloom would lose its edge.
The Chart
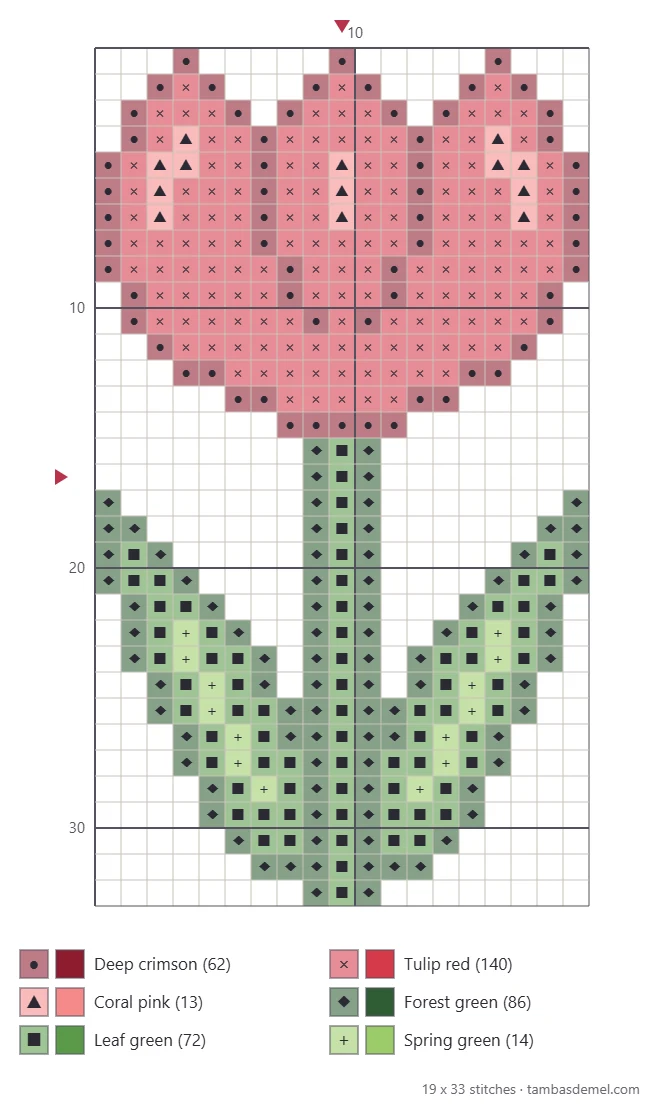
One square on the chart is one cross stitch over one Aida block. The arrows on the edges mark the center column and center row, and the heavier grid lines fall every ten squares. If charts are new to you, the guide on how to read a cross stitch chart explains each of those marks.
Color Key
The colors are given as plain names, not as brand codes. Pull the closest matches from your own stash and lay the skeins side by side before starting: the three reds should step clearly from dark to light, and so should the three greens.
| Symbol | Color | Stitches |
|---|---|---|
| ● | Deep crimson | 62 |
| × | Tulip red | 140 |
| ▲ | Coral pink | 13 |
| ◆ | Forest green | 86 |
| ■ | Leaf green | 72 |
| + | Spring green | 14 |
What matters is the contrast between neighbors, not an exact shade. The deep crimson has to be visibly darker than the main red, or the lines between the petals will disappear once the bloom is filled in.
Finished Size on Different Fabrics
The stitch count never changes, but the finished size does: the higher the Aida count, the smaller the tulip. The table also gives a suggested fabric cut that includes a margin for finishing.
| Aida | Finished design | Fabric to cut (3 in spare per side) |
|---|---|---|
| 11-count | 1.7 x 3 in (4.3 x 7.6 cm) | 8 x 9 in (20.3 x 22.9 cm) |
| 14-count | 1.4 x 2.4 in (3.6 x 6.1 cm) | 7.5 x 8.5 in (19.1 x 21.6 cm) |
| 16-count | 1.2 x 2.1 in (3 x 5.3 cm) | 7.5 x 8.5 in (19.1 x 21.6 cm) |
| 18-count | 1.1 x 1.8 in (2.8 x 4.6 cm) | 7.5 x 8 in (19.1 x 20.3 cm) |
Use 2 strands of floss on 14-count and 16-count, 3 strands on 11-count, and 1 or 2 strands on 18-count. A higher count gives a finer, more delicate tulip; a lower count gives a bolder one that is easier on the eyes.
How to Stitch the Tulip
Starting in the middle keeps the design centered on the fabric. The center column of this chart runs straight through the stem, which makes it a convenient place to begin.
- Find the center. Fold the fabric in half both ways and pinch the folds lightly. Where they cross is the middle of the fabric; match it to the point where the chart’s center arrows meet.
- Stitch the stem core. Thread 2 strands of leaf green and work the center column of the stem up and down from the middle. This line becomes the ruler for everything else.
- Add the dark stem edges. Work one column of forest green on each side of the core.
- Outline the bloom. Count up to the base of the flower and stitch every deep crimson square: the outer edge first, then the two inner lines that separate the front petal from the side petals.
- Fill the petals. Work the main red in rows, then drop in the coral highlights. With the outline already in place, the fill needs almost no counting.
- Stitch the leaves. Outline one leaf in forest green from the base upward, fill it with leaf green, and finish with the line of spring green down the middle. Repeat on the other side, checking that both tips land on the same row.
Tip
When filling a block of one color, stitch a row of half crosses in one direction and complete them on the way back. It is quicker than finishing each cross one at a time and it helps every top leg slant the same way.
Starting and ending threads
With 2 strands, a loop start is the neatest option: fold one long strand in half, thread the two cut ends through the needle and catch the loop on the back with the first stitch. To finish, run the needle under three or four stitches on the back and trim. Knots leave bumps that show through on the front. The full method is in the guide to starting and finishing a thread.
Watch out
Do not carry deep crimson across the back from one petal tip to the next. A dark thread trailing behind unstitched cream fabric can show through as a shadow. End the thread and start again instead.
Color Variations
The bloom is built from just three tones, so recoloring it is simple. Keep the same structure of outline, main shade and highlight, and swap the color family:
- Yellow tulip: golden brown outline, buttercup yellow, pale lemon highlight.
- Pink tulip: deep rose outline, candy pink, shell pink highlight.
- Purple tulip: dark plum outline, violet, soft lilac highlight.
- White tulip: mid gray outline, white, with the highlight left as white too. Stitch this one on a colored fabric so the petals show.
The greens can stay the same for every version. For a row of tulips, repeat the chart side by side and leave a gap of a few empty squares between the leaf tips so the flowers do not crowd each other.
Ways to Use the Finished Tulip
The tall, narrow shape suits upright formats. A few ideas:
- Hoop art: mount it in a small hoop for a spring wall decoration. The steps are in the guide to finishing cross stitch in a hoop.
- Greeting card: stitch it on 16-count or 18-count for a smaller motif that fits an aperture card for a birthday or Mother’s Day.
- Spring trio: stitch it beside the daisy pattern and the lavender bunch for a set of three small florals.
- Linen band or towel edge: repeat three tulips in a row, alternating two colorways.
Before framing, wash the piece gently in lukewarm water with a little mild soap, rinse well, roll it in a towel to remove the water and press it face down on a thick towel so the stitches are not flattened.
Frequently asked questions
Can the tulip be stitched in a different color?
Yes. The bloom uses a dark outline shade, a main shade and a light highlight, so any three tones from one color family will work. Yellow, pink, purple and orange tulips all read well. Keep the darkest shade for the outline so the three petals stay separate.
Is this tulip suitable for a first project?
It is a good second or third project. Every stitch is a full cross, there is no backstitch, and the two halves mirror each other. The only part that needs care is counting the outline of the petals, which is easier if it is stitched before the fill.
How many strands of floss should be used?
Two strands give good coverage on 14-count and 16-count Aida. On 11-count, three strands fill the larger squares better. On 18-count, one strand gives a light look and two strands a denser one.