Lavender Cross Stitch Pattern
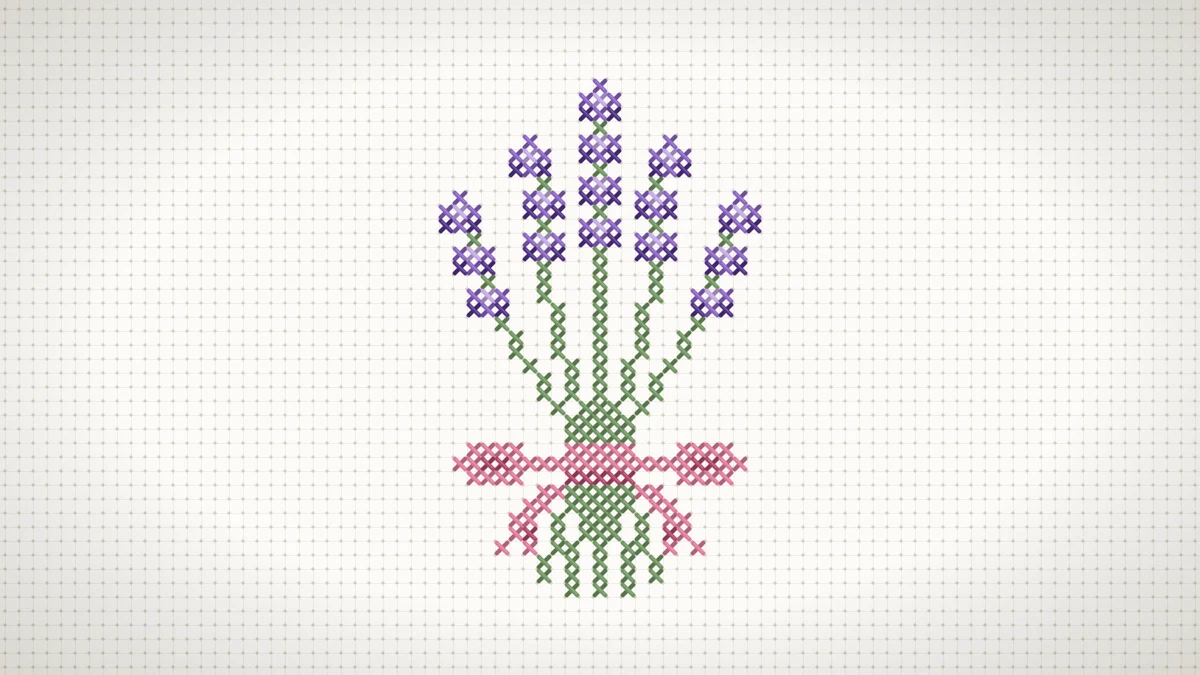
An original bunch of five lavender sprigs tied with a rose pink bow. Shaded purple flower spikes fan out above slim sage stems, all in full cross stitches.
At a glance
Materials
- 14-count white Aida with 3 in (8 cm) spare on each side of the design
- Size 24 tapestry needle
- Stranded cotton floss in three purples (deep, mid and pale), sage green and two rose pinks
- Small sharp embroidery scissors
- Embroidery hoop, 6 in (15 cm), optional
- Printed chart and a pencil or highlighter for marking progress
Lavender translates into cross stitch more naturally than most flowers, because a real flower spike is already made of small separate clusters stacked along a stem. This original lavender cross stitch pattern gathers five sprigs into a small bunch and ties them with a rose pink bow. It measures 23 x 37 stitches and uses 6 colors.
The center sprig stands straight and tall. Two more lean gently away on either side of it, and the outer pair fan out further and sit lower, the way cut stems spread when they are held together near the bottom.
Pattern Details
- Size: 23 x 37 stitches, which is 1.6 x 2.6 in (4.1 x 6.6 cm) on 14-count Aida.
- Stitches: 275 full crosses, with no backstitch.
- Colors: 6: three purples, one green and two pinks.
- Symmetry: the left side mirrors the right, with the center sprig on the middle column.
- Level: intermediate, because the thin stems cross open fabric and need accurate counting.
The stitch count is modest for the size of the design. Much of the area is open fabric between the stems, so the piece grows quickly once the positions are set.
How the flower spikes are built
Every spike is made from the same small unit: a cluster two rows deep with a pale lilac highlight at the top center and deep violet shading at the lower corners. Between one cluster and the next, a single sage green stitch shows the stem. Stack several of those units and the result is the beaded outline that makes lavender recognizable.
On the leaning sprigs, each cluster sits one square further out than the one below it. That small sideways step is all it takes to tilt the spike.
Materials
- 14-count white Aida with 2–3 in (5–8 cm) of spare fabric on every side
- Size 24 tapestry needle
- Stranded cotton floss in the six colors of the key
- Small sharp scissors
- An embroidery hoop, which helps a great deal when stitching single lines across empty fabric
The Chart
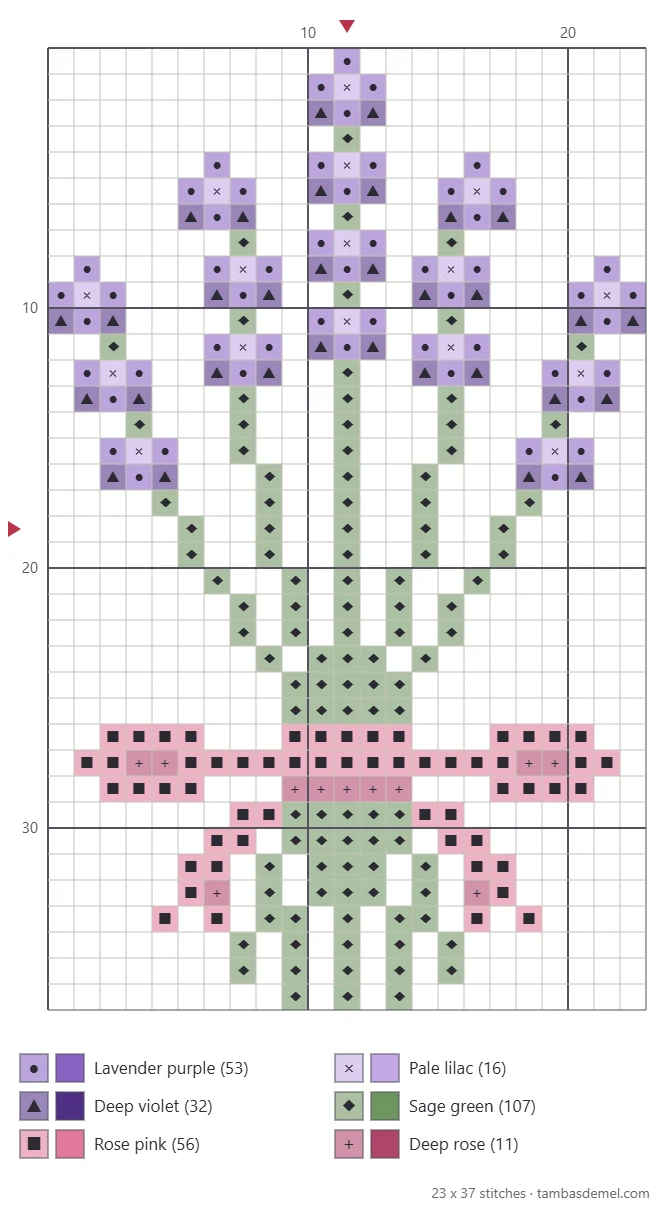
One square equals one cross stitch over one Aida block. Arrows mark the center column and row, and heavier grid lines appear every ten squares. Use those heavier lines as landmarks when moving from one sprig to the next.
Color Key
The key uses plain color names. Choose matching skeins from your own collection, and check that the three purples are clearly different from each other when laid on the fabric.
| Symbol | Color | Stitches |
|---|---|---|
| ● | Lavender purple | 53 |
| × | Pale lilac | 16 |
| ▲ | Deep violet | 32 |
| ◆ | Sage green | 107 |
| ■ | Rose pink | 56 |
| + | Deep rose | 11 |
The pale lilac needs to be noticeably lighter than the main purple, or the highlight will be lost. The sage green should be a soft gray-green, not a bright grass green; lavender stems are muted, and a quieter green lets the purple lead.
Finished Size and Fabric
| Aida | Finished design | Fabric to cut (3 in spare per side) |
|---|---|---|
| 11-count | 2.1 x 3.4 in (5.3 x 8.6 cm) | 8.5 x 9.5 in (21.6 x 24.1 cm) |
| 14-count | 1.6 x 2.6 in (4.1 x 6.6 cm) | 8 x 9 in (20.3 x 22.9 cm) |
| 16-count | 1.4 x 2.3 in (3.6 x 5.8 cm) | 7.5 x 8.5 in (19.1 x 21.6 cm) |
| 18-count | 1.3 x 2.1 in (3.3 x 5.3 cm) | 7.5 x 8.5 in (19.1 x 21.6 cm) |
Work with 2 strands on 14-count and 16-count, 3 strands on 11-count, and 1 or 2 strands on 18-count. The embroidery floss guide explains how to separate strands without tangling them.
Step-by-Step Stitching Order
The safest route is to build the center first and let every other part be counted from stitches that already exist.
- Find the middle. Fold the fabric in half both ways to find its center, and match that point to the center arrows of the chart. The middle falls on the center stem.
- Stitch the center stem. Work the sage green center column upward to the base of the middle spike and downward through the tie to the bottom of the bunch. Skip the squares that belong to the bow; they are filled in later.
- Work the center spike. Stitch the clusters from the bottom up: main purple first, then deep violet, then the pale lilac highlights, finishing with the single stitch at the tip.
- Add the stems beside the center. Where the stems run side by side near the tie, stitch them as one small block. Then follow each stem upward as it steps away from the center.
- Stitch the inner spikes, then the outer ones. Each spike starts where its stem ends. Count the first cluster from the top of the stem, not from a neighboring sprig.
- Stitch the bow. Work the band across the stems first, then a loop on each side, then the two short tails with their notched ends.
- Finish the lower stems. Below the bow the stems spread apart again and end at slightly different lengths.
Tip
Diagonal stem stitches touch only at their corners. On the back, travel from one to the next with a short vertical or horizontal pass instead of a long diagonal one, so the thread does not show through the holes of the fabric.
Counting the diagonal stems
A stem that moves one square sideways every row or two is easy to misplace. Before stitching a stem, mark its squares on the printed chart with a highlighter and count the number of rows it stays in each column. If a sprig ends up in the wrong place, compare it with its twin on the other side; they should be mirror images. The guide to counting cross stitch has more ways to stay on track, and the page on common cross stitch mistakes shows how to fix a miscount without unpicking everything.
Watch out
Do not jump from one flower spike to another with deep violet on the back. On white fabric a dark thread crossing an open area is visible from the front. End the thread under a few stitches and start fresh on the next spike.
Variations
- Single sprig: stitch only the center spike and stem for a narrow motif.
- Three sprigs: leave out the outer pair for a slimmer bunch.
- No bow: replace the bow with two plain rows of a string color, such as a soft tan, across the stems.
- Pink or white blooms: swap the three purples for three pinks, or use white with pale gray shading on a colored fabric.
Finishing Ideas
The obvious home for this design is a lavender sachet. Trim the stitched piece to a rectangle with an even margin, place it right sides together with a piece of cotton backing fabric of the same size, and sew around the edge, leaving a gap. Turn it right side out, fill it with dried lavender, and close the gap by hand.
Other options:
- Mount it in a hoop for a bedroom or bathroom wall, using the method for finishing cross stitch in a hoop.
- Stitch the single-sprig version on a narrow strip of Aida as a bookmark.
- Frame it next to the tulip pattern as part of a small botanical set.
Frequently asked questions
Why is this lavender pattern rated intermediate?
The stitches themselves are ordinary full crosses, but the stems are single lines that move diagonally across open fabric. A miscount of one square shifts a whole sprig. Stitchers who are comfortable counting across gaps will find it straightforward.
Can I stitch only one lavender sprig?
Yes. The center sprig is a straight vertical line, so it works alone as a slim motif for a bookmark or gift tag. Stitch the center flower spike and continue its stem down as far as you like.
What fabric color suits lavender best?
White and cream both work and give a fresh, clean look. Pale gray or a natural oatmeal shade give a more rustic feel. Avoid lilac or blue fabric, where the pale lilac highlight would blend into the background.
Can the bow be a different color?
Any color that contrasts with purple and green will do. Soft yellow, cream on a darker fabric, or a pale blue are good options. Keep two tones, one lighter and one darker, so the bow keeps its folds.