Floral Wreath Cross Stitch Pattern
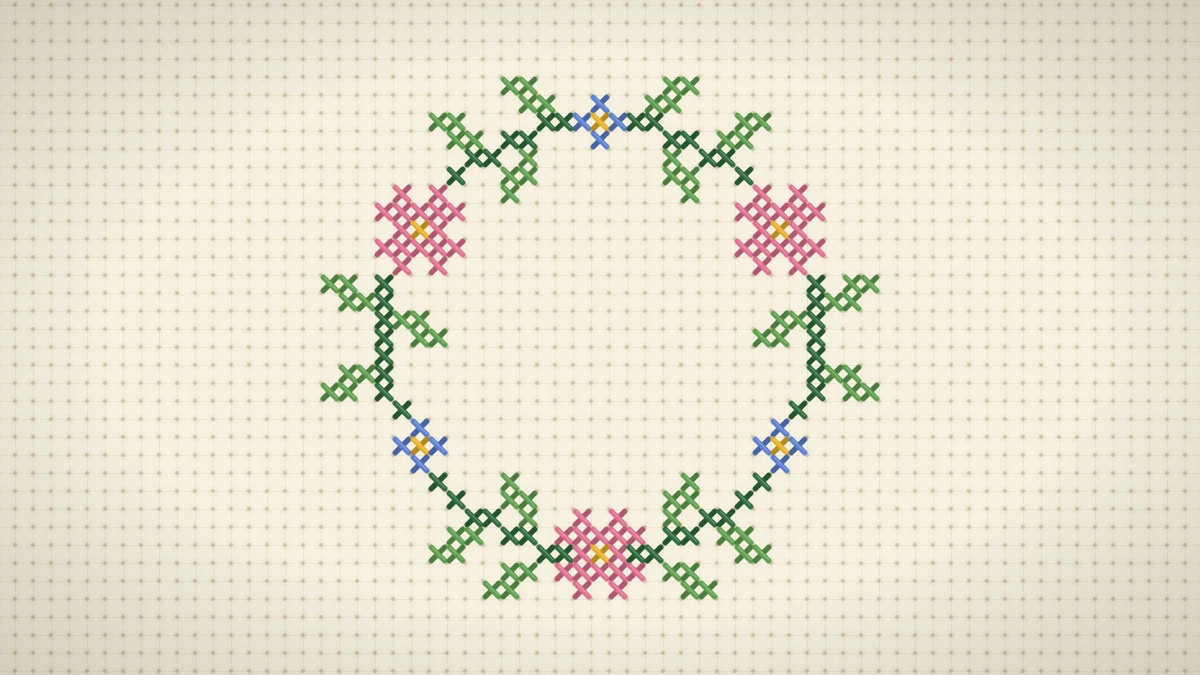
An original small wreath of leaves, rose pink blossoms and tiny blue flowers on a round vine, with an open middle sized for a stitched initial.
At a glance
Materials
- 14-count cream Aida with 3 in (8 cm) spare on each side of the design
- Size 24 tapestry needle
- Stranded cotton floss in rose pink, golden yellow, cornflower blue and two greens
- One extra floss color for the initial, if adding one
- Small sharp embroidery scissors
- Embroidery hoop, 6 in (15 cm), optional
- Printed chart and a pencil or highlighter for marking progress
A wreath is a frame made of flowers, and the empty space inside it is the whole point: it is where an initial, a date or a tiny motif goes. This original floral wreath cross stitch pattern is 31 x 29 stitches in 5 colors. A thin round vine carries three rose pink blossoms, three small blue flowers and pairs of green leaves, and the middle is left open for a letter.
The design is light and airy, with plenty of fabric showing between the leaves, so it stitches up faster than its size suggests. What it asks for in return is careful counting.
What Is in the Wreath
- Size: 31 x 29 stitches, or 2.2 x 2.1 in (5.6 x 5.3 cm) on 14-count Aida.
- Stitches: 184 full crosses. No backstitch.
- Colors: 5: one pink, one yellow, one blue and two greens.
- Symmetry: the left half mirrors the right half.
- Level: intermediate. The stitches are simple, but the elements are spread out and must be placed accurately so the circle closes.
Think of the wreath as a clock face. Rose pink blossoms with golden centers sit at about two, six and ten o’clock. Small blue flowers sit between them at twelve, four and eight o’clock. Leaves grow in pairs along the deep green vine, some pointing outward and some pointing in.
Materials
- 14-count cream Aida with 2–3 in (5–8 cm) of spare fabric on every side
- Size 24 tapestry needle
- Stranded cotton floss in the five colors of the key, plus one color for the initial
- Small sharp scissors
- An embroidery hoop, optional
- A length of sewing thread in a contrasting color for basting guide lines
The Chart
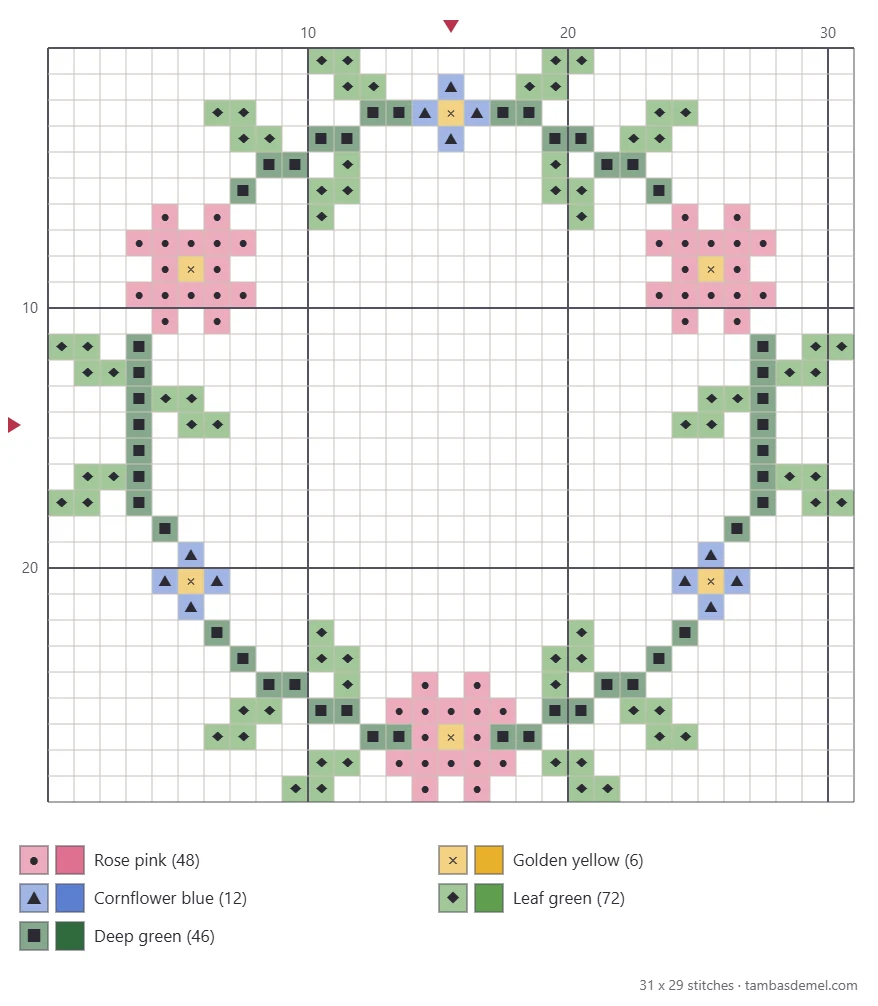
Each square is one stitch over one block of Aida. The arrows on the chart edges point to the center column and center row; where they cross is the middle of the wreath and the middle of your future initial. If any of the chart markings are unfamiliar, see how to read a cross stitch chart.
Color Key
The key lists plain color names. Match them from your own floss, aiming for a clear difference between the two greens: the vine should be the darker one, so the leaves look as if they are growing from it.
| Symbol | Color | Stitches |
|---|---|---|
| ● | Rose pink | 48 |
| × | Golden yellow | 6 |
| ▲ | Cornflower blue | 12 |
| ◆ | Leaf green | 72 |
| ■ | Deep green | 46 |
Finished Size by Fabric Count
| Aida | Finished design | Fabric to cut (3 in spare per side) |
|---|---|---|
| 11-count | 2.8 x 2.6 in (7.1 x 6.6 cm) | 9 x 9 in (22.9 x 22.9 cm) |
| 14-count | 2.2 x 2.1 in (5.6 x 5.3 cm) | 8.5 x 8.5 in (21.6 x 21.6 cm) |
| 16-count | 1.9 x 1.8 in (4.8 x 4.6 cm) | 8 x 8 in (20.3 x 20.3 cm) |
| 18-count | 1.7 x 1.6 in (4.3 x 4.1 cm) | 8 x 8 in (20.3 x 20.3 cm) |
Use 2 strands of floss on 14-count and 16-count Aida, 3 strands on 11-count, and 1 or 2 strands on 18-count. A wreath like this is often mounted in a hoop, so pick the fabric count with the hoop size in mind and leave enough margin to wrap around the back of the inner ring.
How to Stitch the Wreath
The center of this design is empty, so there is nothing to stitch at the point where a project normally begins. The answer is to mark the center lines on the fabric and count out from them.
- Baste the center lines. Fold the fabric in half both ways to find the center. With ordinary sewing thread, run a line of long stitches along the center row and another along the center column. These lines match the arrows on the chart.
- Start with the top blue flower. It sits on the center column. Count up from the middle along the basted line to its golden center stitch, stitch that, and add the blue petals around it.
- Work the vine down one side. Follow the deep green vine from the top flower toward the first pink blossom. The vine moves in short steps of one or two stitches; mark each step on the chart as it is completed.
- Stitch each blossom as you reach it. Work the golden center first and build the pink petals around it. The blossom should sit astride the line of the vine.
- Continue around to the bottom. Carry on down the side, past the small blue flower, to the pink blossom at the base, which sits on the center column.
- Check against the basting. The bottom blossom’s golden center must land exactly on the basted center column. If it does, the first half is correct.
- Repeat on the other side. Work the second half as a mirror image, again from the top down.
- Add the leaves. Stitch all the leaf green last. Each leaf is a small slanted shape attached to the vine.
- Remove the basting once the wreath is finished, or after the initial is stitched if you are adding one.
Tip
Where the vine runs straight down the side, count its stitches and compare them with the same stretch on the opposite side. Matching the two sides row for row is the quickest way to confirm that the circle is round.
More methods for counting across open fabric, including gridding, are covered in the guide to counting cross stitch.
Watch out
Leaves and flowers are separated by empty fabric. Do not carry the thread across those gaps on the back, least of all across the open middle. End the thread under three or four stitches and start again at the next leaf.
Adding an Initial
The open middle comfortably holds a block capital 5 stitches wide and 7 stitches tall, which is the size used in the modern cross stitch alphabet. Because both the wreath and a letter of that size have a single middle column and a single middle row, the letter can be centered exactly.
- Find the middle square of the letter on its chart: the third column and the fourth row.
- Stitch that square, or the nearest stitched square to it, at the point where the basted lines cross.
- Count the rest of the letter outward from there.
Letters with a heavy side, such as L or P, can look off-center even when they are placed correctly. Lay a paper cutout of the letter in the wreath first and nudge it by one square if the balance looks better.
Choosing a color for the letter
The deep green of the vine is the quiet, classic choice. Rose pink ties the letter to the blossoms, and cornflower blue to the small flowers. A color from outside the palette, such as a charcoal gray, makes the letter the focus and the wreath a frame.
Variations and Finishing
- Different blossoms: swap rose pink for soft yellow, lilac or coral. Change the center to a contrasting color if yellow petals are used.
- Autumn wreath: use rust and gold for the flowers and olive for the leaves.
- Winter wreath: stitch the blossoms in red with dark green leaves for a seasonal version.
- A small motif in the middle: instead of a letter, place a tiny heart or star from the set of mini cross stitch motifs in the center.
Finishing the wreath
A round design belongs in a round frame. Choose a hoop that leaves at least a finger’s width of plain fabric between the outer leaves and the wood, center the wreath, and follow the steps for finishing cross stitch in a hoop. A personalized wreath also makes a thoughtful gift for a new baby, a wedding or a housewarming when stitched with the recipient’s initial.
Frequently asked questions
What size of letter fits inside the wreath?
A block letter 5 stitches wide and 7 stitches tall sits in the middle with generous space around it. Larger or more decorative letters also fit as long as they stay well inside the inner leaves. Chart the letter on graph paper first and compare it with the open area before stitching.
Does the wreath have to hold an initial?
No. The wreath is complete without one and can be left empty. The middle can also hold a small motif, a date in tiny numerals, or a short word stitched in two lines.
Where should the first stitch go when the center is empty?
Find the center of the fabric as usual, then count out from it to the nearest stitched part of the wreath. A line of removable basting along the center row and column makes that count much easier. Remove the basting once the vine is complete.