How to Start Cross Stitch: A First-Day Guide with a Practice Motif
Everything needed for a first day of cross stitch: the supplies, how one cross is made, and a tiny original blossom chart to stitch right away.
At a glance
Materials
- 14-count cream or white Aida with 3 in (8 cm) spare on each side
- Size 24 tapestry needle
- Stranded cotton floss in rose pink, honey yellow and leaf green
- Small sharp scissors
- 4 in (10 cm) embroidery hoop (optional)
Learning how to start cross stitch takes less equipment and less time than most crafts. One piece of gridded fabric, a blunt needle, a few lengths of cotton thread and a single stitch repeated over and over are all it takes. This guide covers the supplies for day one, shows exactly how one cross is made, and ends with a tiny blossom motif you can stitch as soon as your thread is cut.
What You Need on Day One
A first project needs only a handful of things, and none of them is specialized or expensive.
- Aida fabric, 14-count. Aida is woven in small, clearly visible blocks with a hole at every corner. “14-count” means 14 stitches to the inch, which is large enough to see easily and fine enough to look neat. The Aida fabric guide explains the other counts.
- A size 24 tapestry needle. Tapestry needles have a blunt tip and a long eye. The blunt tip finds the holes in the fabric instead of splitting the threads.
- Stranded cotton floss. This is the standard cross stitch thread. It comes as six loose strands that you separate before stitching.
- Small, sharp scissors. Any pair that cuts thread cleanly will do.
- An embroidery hoop (optional). A hoop of about 4 in (10 cm) keeps the fabric taut. Small pieces can also be stitched held in the hand.
Get the Fabric and Thread Ready
- Cut the fabric with room to spare. Leave 2–3 in (5–8 cm) of empty fabric on every side of the design. The spare fabric gives you something to hold and makes framing or finishing possible later.
- Find the center. Fold the fabric in half, then in half again the other way. The corner where the folds meet is the center. Pinch it lightly or mark it with a pin.
- Cut the floss. A working length of about 18 in (45 cm) is long enough to make progress and short enough not to tangle or fray.
- Separate the strands. Pull one strand at a time out of the cut length, then lay two strands together. Two strands is the usual thickness for 14-count Aida. The embroidery floss guide shows how to separate strands without knots.
- Thread the needle. Pass both strands through the eye and leave a short tail hanging so the needle does not slip off.
How to Make Your First Cross Stitch
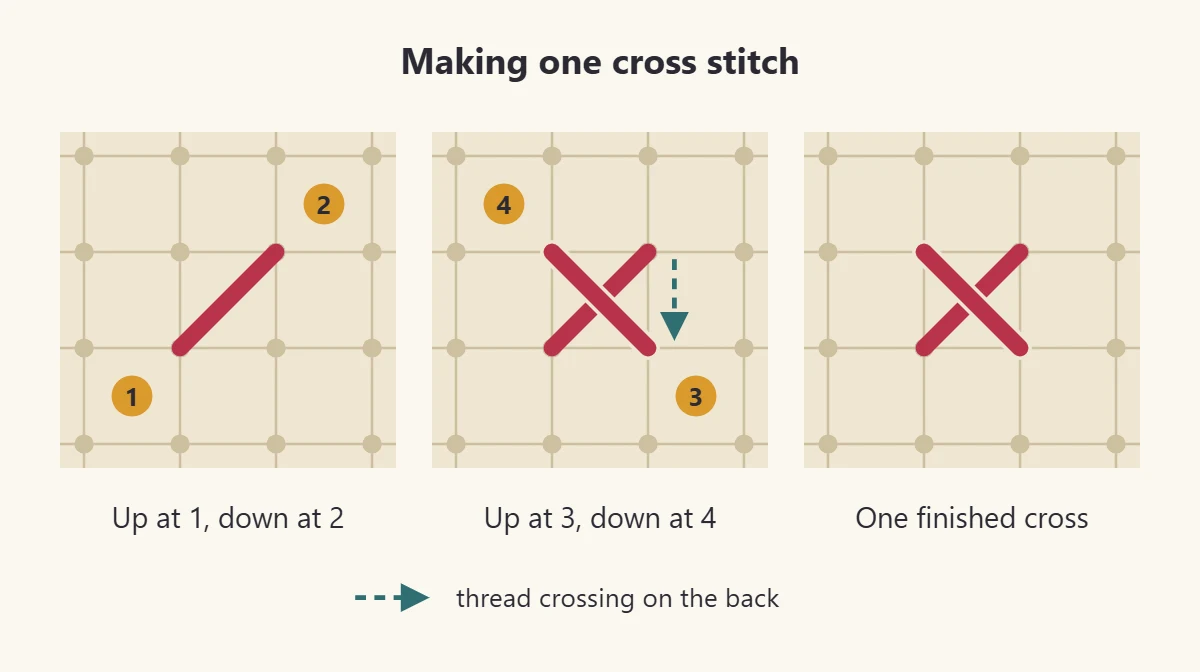
A cross stitch covers one block of Aida. It is made of two diagonal legs that cross in the middle of the block, using the four holes at its corners.
- Bring the needle up from the back at the bottom-left hole. Leave about an inch (2.5 cm) of thread on the back and hold it there with a finger.
- Take the needle down at the top-right hole. That is the first leg.
- Bring the needle up at the bottom-right hole. On the back, make sure the thread passes over the loose tail so the next few stitches trap it.
- Take the needle down at the top-left hole. The second leg crosses the first, and the stitch is finished.
For a row of the same color, most stitchers work all the first legs from left to right, then come back from right to left adding the second legs. It is quicker, uses the thread evenly and leaves tidy vertical lines on the back.
Watch out
Every top leg must slant the same way across the whole piece. Mixed directions catch the light differently and make the surface look uneven, even when the colors are right.
There are no knots in cross stitch. The starting tail is held under the first few stitches, and a finished thread is run under three or four stitches on the back before it is trimmed. Other ways to begin, including the neat loop start, are covered in how to start and finish a thread.
Your First Practice Motif: A Little Blossom
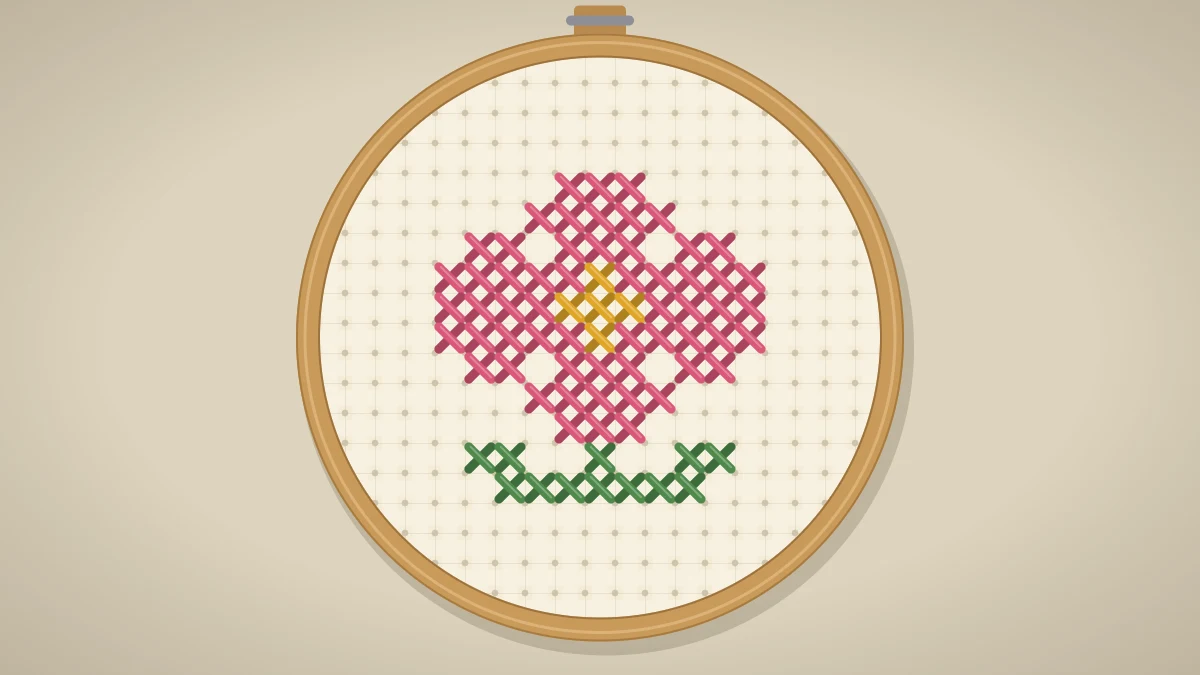
This original blossom is 11 x 11 stitches, uses 3 colors and contains 75 full crosses. On 14-count Aida it finishes at 0.8 x 0.8 in (2 x 2 cm). It is small enough to finish in a sitting or two, yet it includes everything a larger design asks of you: rows of different lengths, a color change in the middle, and gaps to count across.
The colors are suggestions. Any pink, yellow and green from your stash will work, as long as each one stands out clearly against the fabric.
The Chart
Each square of the chart is one cross stitch over one block of Aida. The symbol in the square tells you which color to use, and the arrows at the edges mark the center lines. If charts are new to you, how to read a cross stitch chart walks through every part.
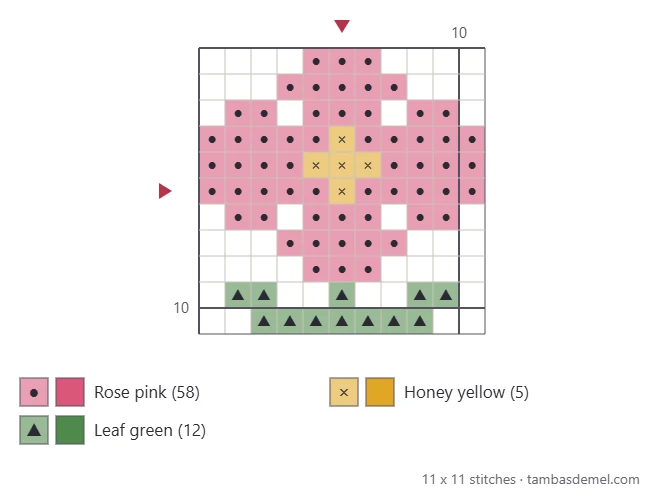
| Symbol | Color | Stitches |
|---|---|---|
| ● | Rose pink | 58 |
| × | Honey yellow | 5 |
| ▲ | Leaf green | 12 |
Stitching the Blossom Step by Step
- Start with the yellow center. Find the middle of the flower on the chart and the center of your fabric, and stitch the small yellow plus shape first. Starting in the middle keeps the design centered on the fabric.
- Add the pink row beside the center. Work the widest pink row on each side of the yellow, counting squares on the chart and blocks on the fabric as you go.
- Build the petals upward. Stitch one row at a time, checking each row against the one below it. Where a row has a gap, count the empty squares before placing the next stitch.
- Turn back and stitch the lower petals. They mirror the upper ones, so the finished top half is a ready-made reference.
- Finish with the green leaves. The leaves sit directly under the flower. End the pink thread first, then begin the green as you began the yellow.
- Secure each thread. On the back, slide the needle under three or four stitches of the same color, pull through and trim close.
Tip
If the floss starts to twist and kink, let the needle hang freely from the fabric for a moment. The thread untwists on its own and the stitches lie flatter.
Finished Size on Different Fabrics
The same chart comes out larger or smaller depending on the fabric count, because finished size in inches is simply the number of stitches divided by the count. The table gives the size of the blossom on the four common counts and a fabric cut that includes spare margin.
| Aida | Finished design | Fabric to cut (3 in spare per side) |
|---|---|---|
| 11-count | 1 x 1 in (2.5 x 2.5 cm) | 7 x 7 in (17.8 x 17.8 cm) |
| 14-count | 0.8 x 0.8 in (2 x 2 cm) | 7 x 7 in (17.8 x 17.8 cm) |
| 16-count | 0.7 x 0.7 in (1.8 x 1.8 cm) | 7 x 7 in (17.8 x 17.8 cm) |
| 18-count | 0.6 x 0.6 in (1.5 x 1.5 cm) | 7 x 7 in (17.8 x 17.8 cm) |
What to Stitch Next
Once the blossom is done, look at the back. Short, mostly vertical stitches and no long trailing threads mean your rows are working well. Then look at the front: if the top legs all slant the same way, the most important habit is already in place.
A good second project is a motif with a little shading, such as the easy heart cross stitch pattern. It uses exactly the same stitch, with one extra shade to practice changing colors inside a shape.
Frequently asked questions
Is cross stitch hard to learn?
Cross stitch uses one basic stitch, so the technique itself is quick to pick up. Most of the skill lies in counting carefully and keeping every top leg slanting the same way. A small motif on 14-count Aida is enough to learn both.
Do I need an embroidery hoop to start cross stitch?
No. A hoop keeps the fabric taut and can make even stitches easier, but Aida is stiff enough to hold in the hand, especially for small designs. Try both ways and keep the one that feels more comfortable.
Where on the fabric should the first stitch go?
Start at the center of the design, placed at the center of the fabric. Fold the fabric in quarters to find its middle and use the arrows on the chart to find the middle of the design. Working outward from there keeps the margins even on all sides.
Why should I avoid knots in cross stitch?
Knots make small bumps that show through when the piece is pressed, framed or mounted, and they can work loose or pull through a hole. Holding the tail under the first stitches and running the end under finished stitches is flatter and just as secure.