Honey Bee Cross Stitch Pattern
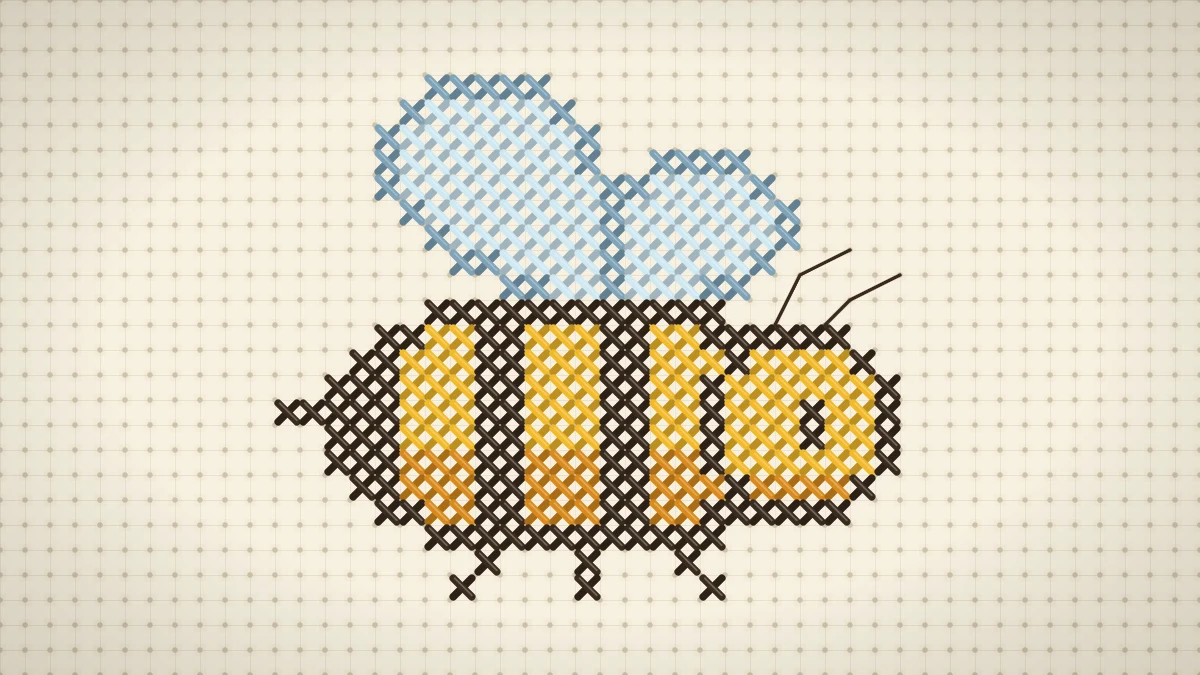
An original round honey bee in flight, with striped body, pale blue wings and backstitched antennae, charted in five colors.
At a glance
Materials
- 14-count cream Aida with 3 in (8 cm) spare on each side
- Size 24 tapestry needle
- Stranded cotton floss in dark brown, honey yellow, amber, pale sky blue and blue gray
- Small sharp scissors
- 4 in (10 cm) embroidery hoop (optional)
“Mel” means honey, so a bee was always going to find its way onto this site. This honey bee cross stitch pattern is an original chart of a round, striped bee seen from the side, flying toward the right with two pale wings raised over its back. It measures 26 x 21 stitches, uses 5 colors and has 308 full cross stitches, with two backstitched antennae as an optional last touch.
Stripes make this a friendly project for anyone still getting used to counting. Every band of the body is the same width, so a miscount shows up immediately and can be fixed before it travels far.
About the Design
The bee is built from three simple shapes: an oval body, a round head that overlaps the front of it, and two teardrop wings.
- The body has a dark brown outline and alternating bands of yellow and dark brown. The upper rows are honey yellow and the lower rows are amber, which makes the body look rounded instead of flat.
- The head is plain yellow with a single dark eye, two stitches tall.
- The wings are pale sky blue with a blue gray outline. The larger wing sits toward the back and the smaller one tucks in beside it, sharing one outline column where they meet.
- The stinger and legs are single dark stitches: a short point at the tail and three little legs trailing beneath the body.
What You Need
- 14-count cream Aida, cut with 3 in (8 cm) of spare fabric on every side of the design
- A size 24 tapestry needle
- Stranded cotton floss in dark brown, honey yellow, amber, pale sky blue and blue gray
- Small sharp scissors
- A small embroidery hoop, if you prefer one
Use two strands for the cross stitches on 14-count fabric and one strand for the antennae. Floss comes as six loosely twisted strands that you separate and recombine; the embroidery floss guide shows how to pull strands apart without tangling the rest of the length.
The Chart
One square equals one stitch. Arrows mark the center of each edge, and the darker grid lines every ten squares make it easier to keep your place.
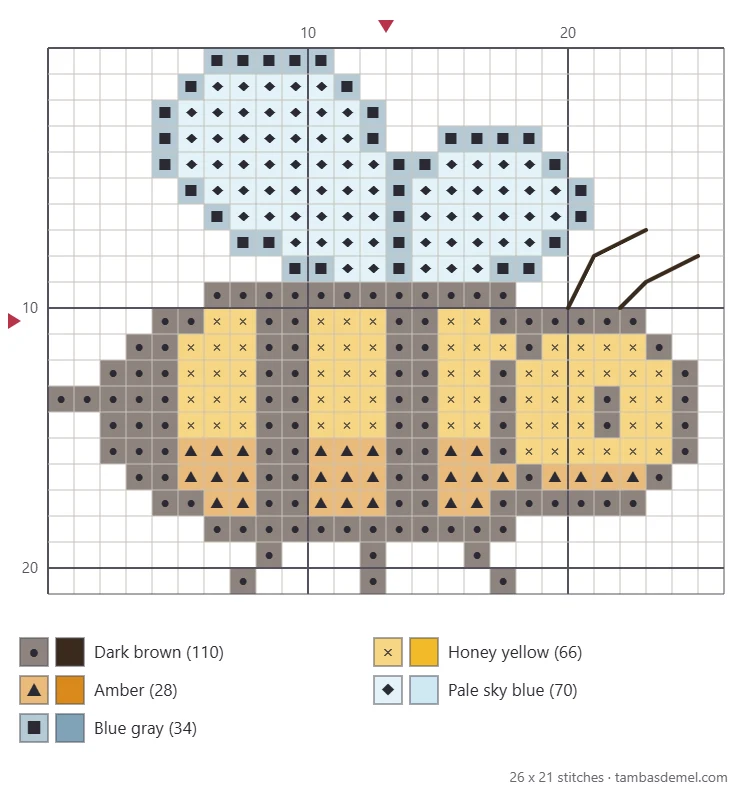
| Symbol | Color | Stitches |
|---|---|---|
| ● | Dark brown | 110 |
| × | Honey yellow | 66 |
| ▲ | Amber | 28 |
| ◆ | Pale sky blue | 70 |
| ■ | Blue gray | 34 |
The colors are described by name, not by brand number, so choose from what you have. The two yellows matter most: the amber should be clearly deeper than the honey yellow, but still a yellow-orange and not a brown, or the lower stripes will merge with the outline.
Finished Size
Stitched on 14-count Aida, the bee comes out at 1.9 x 1.5 in (4.8 x 3.8 cm). Other counts change the size as follows.
| Aida | Finished design | Fabric to cut (3 in spare per side) |
|---|---|---|
| 11-count | 2.4 x 1.9 in (6.1 x 4.8 cm) | 8.5 x 8 in (21.6 x 20.3 cm) |
| 14-count | 1.9 x 1.5 in (4.8 x 3.8 cm) | 8 x 7.5 in (20.3 x 19.1 cm) |
| 16-count | 1.6 x 1.3 in (4.1 x 3.3 cm) | 8 x 7.5 in (20.3 x 19.1 cm) |
| 18-count | 1.4 x 1.2 in (3.6 x 3 cm) | 7.5 x 7.5 in (19.1 x 19.1 cm) |
How to Stitch the Bee
Find the center of your fabric by folding it in half in both directions, and match it to the arrows on the chart. The center lands at the top of the body where the wings join it, so the first stitches you make will be dark brown outline.
- Outline the top of the body. Stitch the long dark brown row that forms the bee’s back. This single row is the reference line for everything else: the wings sit on top of it and the stripes hang below it.
- Work the stripes downward. Stitch the dark bands first, row by row, down to the bottom outline. They run in straight columns, so each new row sits directly under the last one.
- Fill in the yellow. Add honey yellow between the dark bands in the upper rows, then switch to amber for the lower rows. The change from one yellow to the other happens on the same row all the way across the body.
- Stitch the head. Work the dark outline of the head, then fill it with honey yellow, leaving the two eye stitches for dark brown. The bottom row inside the head is amber, matching the shading on the body.
- Add the wings. Stitch both blue gray outlines first, counting up from the back of the bee, then fill them with pale sky blue.
- Finish the small parts. Add the stinger at the tail and the three legs below the body. Each leg is two stitches that step diagonally, with the middle leg hanging straight down.
Tip
Stitch the pale wing color with clean hands and a fresh length of floss, and do it after the dark brown is finished. Light thread picks up loose dark fibers easily when the two are worked side by side.
Carrying thread between stripes
The dark bands are close together, so it is fine to carry the dark brown across the back from one band to the next instead of ending the thread each time. Keep each carry short and pass it under the backs of existing stitches where you can. Do not carry dark thread behind the wings: the pale blue and the cream fabric are both light enough for a dark strand to shadow through.
Adding the Antennae
Each antenna is a bent line made of two straight stitches, worked in one strand of dark brown. Both start on the top edge of the head, climb steeply for two squares, then lean forward toward the right.
Bring the needle up at the hole on the head, go down at the bend, come up again at the tip and go back down into the bend. That is ordinary backstitch, just with longer steps than usual. The full method, including how to secure a single strand, is in the backstitch tutorial.
Watch out
The antennae cross open fabric, so there are no stitches nearby to hide a thread end. Start and finish under the dark outline of the head, never out at the tip.
Color Variations
| Look | Change |
|---|---|
| Graphic | Use black in place of dark brown and stitch on white Aida |
| Soft | Swap the dark brown for a warm mid brown and use blush fabric |
| Flat color | Stitch the whole body in honey yellow and leave out the amber |
| White wings | On sage or sky fabric, fill the wings with white and keep the blue gray outline |
Ideas for Using the Bee
A single bee fills a small hoop nicely, but the motif is at its best in a group. Stitch three bees at different heights, flipping one by reading the chart from the opposite side, and link them with a dotted flight path in running stitch.
Bees also pair naturally with flowers. Place one above the daisy chart or beside the lavender bunch, leaving a few empty squares between the two designs so the wings have room. For a border of small matching pieces, the set of mini motifs shares the same simple, rounded drawing style.
On 18-count fabric the bee becomes small enough for a jar-lid topper or a gift tag for a pot of honey.
Frequently asked questions
Do I have to backstitch the antennae?
No. The antennae are two short lines in a single strand of dark brown, added at the very end. Without them the bee is still easy to recognize from its stripes and wings.
Can I use black instead of dark brown?
Yes. Black gives a sharper, more graphic bee, while dark brown looks softer against cream fabric. Use the same color for the outline, the stripes, the legs and the antennae so the design stays consistent.
Why do the wings have an outline?
Pale blue on cream fabric has very little contrast, so the wings would fade into the background on their own. The blue gray outline defines their shape while keeping them lighter than the body.
How can I make several bees face different ways?
Read the chart from right to left instead of left to right to flip the bee so it faces the other direction. Count each row from the opposite edge and the shape reverses without any redrawing.