Butterfly Cross Stitch Pattern
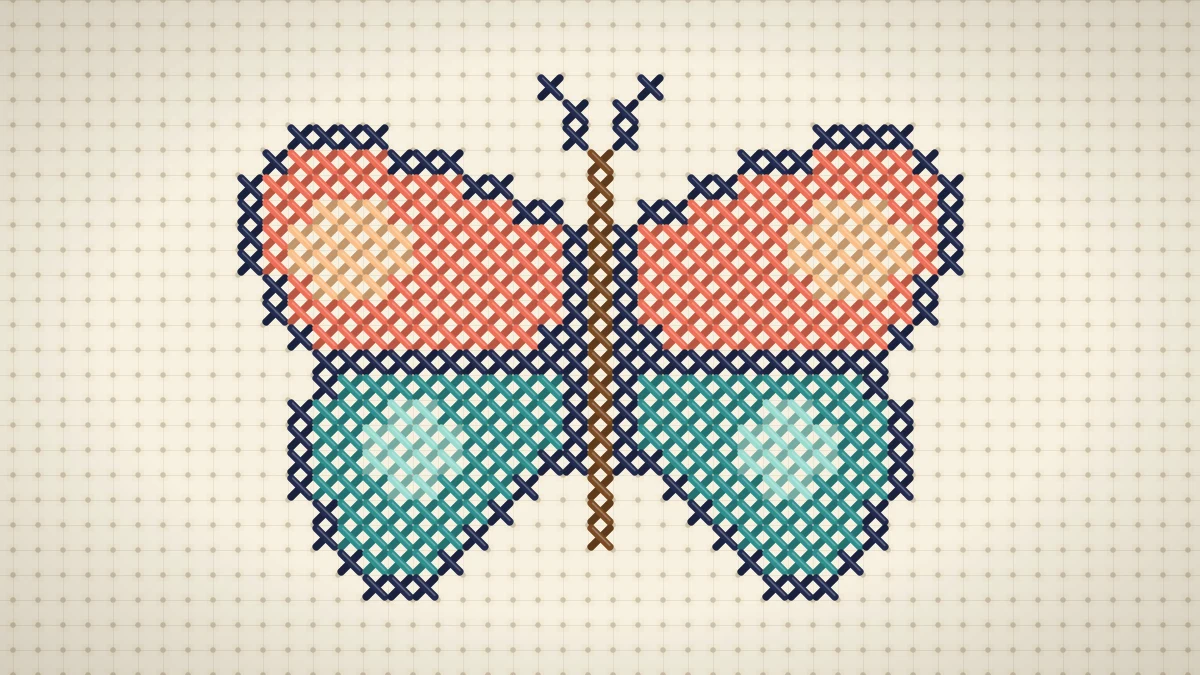
An original symmetric butterfly with coral upper wings, teal lower wings and a navy outline, charted in six colors.
At a glance
Materials
- 14-count cream Aida with 3 in (8 cm) spare on each side
- Size 24 tapestry needle
- Stranded cotton floss in deep navy, coral, peach, teal, aqua and chestnut brown
- Small sharp scissors
- 5 in (13 cm) embroidery hoop (optional)
Symmetry does half the work in a butterfly cross stitch pattern: once one wing is stitched, the other is the same shape counted in the opposite direction. This original butterfly has broad coral upper wings with a peach patch, rounded teal lower wings with an aqua spot, a navy outline around every section and a slim chestnut body down the middle. It is 29 x 21 stitches, uses 6 colors and contains 408 full cross stitches. There is no backstitch; even the antennae are made of ordinary crosses.
About the Design
The butterfly is shown with its wings open flat, as if seen from above. The left and right halves are exact mirror images, with the body sitting on a single center column.
- Upper wings. These are the widest part of the design. Each one sweeps out from the body, rises to a squared-off tip, then curves back in. The peach patch sits toward the outer edge.
- Lower wings. Slightly narrower and more rounded, they taper to a soft point at the bottom. The aqua spot is a small diamond in the middle of each one.
- Outline. Deep navy surrounds each wing and forms a full row between the upper and lower pair, so the four wings read as separate panels.
- Body and antennae. The body is one column of chestnut brown. Above the head, the antennae spread into a narrow V of navy stitches, stepping outward diagonally at the tips.
What You Need
- 14-count cream Aida, cut with 3 in (8 cm) of spare fabric on every side of the design
- A size 24 tapestry needle
- Stranded cotton floss in deep navy, coral, peach, teal, aqua and chestnut brown
- Small sharp scissors
- An embroidery hoop, if you use one
Stitch with two strands on 14-count fabric. Two strands is an even number, which means you can use a loop start: fold one long strand in half, thread the two cut ends through the needle and catch the loop on the back with your first stitch. It leaves no tail to bury.
The Chart
Every square is one cross stitch over one block of Aida. The arrows on the top and side edges mark the center; on this chart the vertical center line runs straight down the body.

| Symbol | Color | Stitches |
|---|---|---|
| ● | Deep navy | 118 |
| × | Coral | 122 |
| ▲ | Peach | 32 |
| ◆ | Teal | 96 |
| ■ | Aqua | 24 |
| + | Chestnut brown | 16 |
Match the colors from your own floss by name. What matters is the relationship between them: peach should look like a lighter version of coral, and aqua a lighter version of teal, so each wing appears to have one color with a glow in the middle. The navy needs to be dark enough to work as an outline against both.
Finished Size
Worked on 14-count Aida the butterfly measures 2.1 x 1.5 in (5.3 x 3.8 cm). On other fabrics:
| Aida | Finished design | Fabric to cut (3 in spare per side) |
|---|---|---|
| 11-count | 2.6 x 1.9 in (6.6 x 4.8 cm) | 9 x 8 in (22.9 x 20.3 cm) |
| 14-count | 2.1 x 1.5 in (5.3 x 3.8 cm) | 8.5 x 7.5 in (21.6 x 19.1 cm) |
| 16-count | 1.8 x 1.3 in (4.6 x 3.3 cm) | 8 x 7.5 in (20.3 x 19.1 cm) |
| 18-count | 1.6 x 1.2 in (4.1 x 3 cm) | 8 x 7.5 in (20.3 x 19.1 cm) |
How to Stitch a Symmetric Design
The body is your ruler. Because it sits on the center column, every stitch on the left has a partner the same distance from the body on the right.
- Find the center. Fold the fabric in half both ways and mark the point where the folds cross. Match it to the center arrows. The center of the design is on the body, level with the lower edge of the upper wings.
- Stitch the body. Work the chestnut column from the center up to the head and down to the tail. It is quick, and it gives you a straight line to count from on both sides.
- Outline one upper wing. Using navy, stitch the outline of the left upper wing, starting with the column beside the body. Check that the outline closes where the chart says it should before you fill anything in.
- Fill the wing. Stitch the peach patch first, then surround it with coral.
- Repeat on the right. Stitch the right upper wing, counting each row outward from the body. After every few rows, compare the number of stitches with the finished left wing.
- Work the lower wings. Outline, add the aqua spot, fill with teal, then mirror it on the other side.
- Add the antennae. Each one is three navy stitches: two stacked directly above each other beside the center line, and a third stepping one square farther out at the top.
Tip
To check symmetry without counting every square, fold the fabric lightly along the body and hold it up to the light. The outlines of the two wings should lie on top of each other.
Keeping the stitches consistent
A mirrored shape does not mean mirrored stitches. The top leg of every cross must slant the same way on both wings, even though the wings themselves face opposite directions. Reversing the slant on one side is a common slip in symmetric designs, and it changes how the light reflects off that wing. This and other easy-to-miss errors are covered in common cross stitch mistakes.
Watch out
The antennae and the upper wingtips are separated by empty fabric. Do not carry navy thread across that gap on the back: it will show through the cream Aida. Finish the thread under the wing outline and start again for each antenna.
Color Schemes to Try
Because the chart separates each wing into a main color and a lighter accent, it is easy to recolor. Choose two color families and take a medium and a light shade from each.
| Scheme | Upper wings | Lower wings | Outline |
|---|---|---|---|
| Meadow | Golden yellow with pale lemon | Leaf green with mint | Dark brown |
| Dusk | Violet with lilac | Rose with pale pink | Deep plum |
| Sky | Royal blue with pale blue | Royal blue with pale blue | Charcoal |
| Autumn | Burnt orange with gold | Rust red with apricot | Dark brown |
On colored Aida such as sage or sky blue, test a few stitches of each floss on a corner of the fabric first. A color that looks strong on cream can sink into a mid-toned background.
Where to Use It
The butterfly is wider than it is tall, so it suits an oval hoop or sits in a round one with room above and below for a border. For a larger piece, scatter three butterflies at different angles by turning the chart a quarter turn for one of them; a design made of whole crosses can be rotated freely.
It also makes a good companion for flower charts. A butterfly stitched above and to one side of the daisy pattern or the tulip turns a single motif into a small garden scene, and a strip from the border patterns underneath finishes it off. Leave at least three or four empty squares between separate designs so their outlines do not crowd each other.
Frequently asked questions
Does it matter which wing I stitch first?
No. Many stitchers finish one complete side and then copy it across, checking each row against the finished wing. Others work both sides a section at a time so that any miscount is caught early.
Can I use just two colors for the wings?
Yes. Stitch both the upper and lower wings in one color and use a lighter shade of it for the spots. Keep the dark outline, because it is what separates the upper wing from the lower one.
Why is the chart an odd number of stitches wide?
The body runs down a single center column, with identical wings on each side. One center column plus two equal halves always gives an odd width, and it means the body sits exactly on the center line of the fabric.